Last updated June 10, 2024
Is Omnisend the right email marketing tool for your business? Explore its strengths, weaknesses, and pricing details in our review.
Omnisend 1-minute summary: Pros & Cons
Omnisend has affordable pricing, strong automation, excellent newsletter features, and comprehensive reporting. It offers great value compared to competitors like Klaviyo. However, it is not recommended for non-e-commerce businesses. While Omnisend has pros such as a robust free plan and effective automation, it has cons including limited segmentation filters, lack of full unsubscribe automation, subpar reporting for forms and landing pages, inability to use custom domains, and mediocre customer support.
You can trust our reviews✔️ We spend days testing and comparing this software to help you find the best marketing tool. Click here to find out more about how we test products.
Recommended if
Not recommended if
Omnisend Pros
Omnisend Cons
Omnisend Review: Pricing
In this pricing section of my Omnisend review, we’ll cover:
- Different plans & Prices Omnisend
- Available discounts
- Omnisend’s pricing structure
- Price comparison with its biggest competitor, Klaviyo
In short, Omnisend is more affordable than its biggest competitor, Klaviyo.
Want more details? Keep reading …
Different plans Omnisend
- Forever free ($0)
- Standard – Email (starting at $16)
- Pro – Email+SMS (starting at $59)
Prices Omnisend
1) Omnisend Standard (Tier 1)
The table below shows Omnisend’s Standard tier prices and the number of emails you can send monthly. For the Standard tier, they use a multiplier of 12. For example, if you have 1,000 contacts, you can send 12,000 emails (1,000 times 12). This tier also includes roughly 60 one-time SMS credits, with the option to purchase more if needed.
| Contacts | Price/mo | Max emails/mo |
|---|---|---|
| 0 | $16 | 6,000 |
| 250 | $16 | 6,000 |
| 500 | $16 | 6,000 |
| 1,000 | $20 | 12,000 |
| 1,500 | $25 | 18,000 |
| 2,000 | $30 | 24,000 |
| 2,500 | $44 | 30,000 |
| 3,000 | $50 | 36,000 |
| 3,500 | $56 | 42,000 |
| 4,000 | $63 | 48,000 |
| 4,500 | $75 | 54,000 |
| 5,000 | $81 | 60,000 |
| 5,500 | $88 | 66,000 |
| 6,000 | $100 | 72,000 |
| 6,500 | $106 | 78,000 |
| 7,000 | $113 | 84,000 |
| 9,000 | $127 | 108,000 |
| 10,000 | $132 | 120,000 |
| 10,500 | $150 | 126,000 |
| 11,000 | $163 | 132,000 |
| 11,500 | $169 | 138,000 |
| 12,000 | $175 | 144,000 |
| 12,500 | $188 | 150,000 |
| 13,000 | $200 | 156,000 |
| 13,500 | $206 | 162,000 |
| 15,000 | $207 | 180,000 |
| 16,000 | $228 | 192,000 |
| 17,000 | $240 | 204,000 |
| 18,500 | $253 | 222,000 |
| 20,000 | $265 | 240,000 |
| 21,500 | $270 | 258,000 |
| 23,500 | $276 | 282,000 |
| 25,000 | $282 | 300,000 |
| 26,000 | $288 | 312,000 |
| 27,000 | $319 | 324,000 |
| 28,000 | $325 | 336,000 |
| 29,000 | $331 | 348,000 |
| 30,000 | $338 | 360,000 |
| 31,000 | $344 | 372,000 |
| 32,000 | $350 | 384,000 |
| 35,000 | $356 | 420,000 |
| 37,500 | $363 | 450,000 |
| 40,000 | $375 | 480,000 |
| 45,000 | $388 | 540,000 |
| 50,000 | $413 | 600,000 |
| 55,000 | $450 | 660,000 |
| 60,000 | $500 | 720,000 |
| 65,000 | $550 | 780,000 |
| 70,000 | $600 | 840,000 |
| 75,000 | $650 | 900,000 |
| 80,000 | $700 | 960,000 |
| 85,000 | $750 | 1,020,000 |
| 90,000 | $800 | 1,080,000 |
| 95,000 | $850 | 1,140,000 |
| 100,000 | $900 | 1,200,000 |
| 105,000 | $988 | 1,260,000 |
| 110,000 | $1,040 | 1,320,000 |
| 115,000 | $1,092 | 1,380,000 |
| 120,000 | $1,144 | 1,440,000 |
| 125,000 | $1,196 | 1,500,000 |
| 130,000 | $1,248 | 1,560,000 |
| 135,000 | $1,300 | 1,620,000 |
| 140,000 | $1,352 | 1,680,000 |
| 145,000 | $1,404 | 1,740,000 |
| 150,000 | $1,456 | 1,800,000 |
| >150000 | 150,000+: Custom Pricing | 150,000+: Custom Pricing |
2) Omnisend Pro (tier 2)
The table below details Omnisend’s Pro tier, which allows you to send unlimited emails, unlike the Standard tier. Regarding SMS credits, which we will discuss later in this review, the monthly subscription price you pay is also the amount you receive in SMS credits. For instance, with a plan for 1,000 contacts costing $59 per month, you would receive $59 worth of SMS credits. This equates to 3,933 SMS credits in the U.S., given that the charge is $0.015 per SMS in the U.S.
| Contacts | Price/mo |
|---|---|
| 0 | $59 |
| 250 | $59 |
| 500 | $59 |
| 1,000 | $59 |
| 1,500 | $59 |
| 2,000 | $59 |
| 2,500 | $59 |
| 3,000 | $70 |
| 3,500 | $75 |
| 4,000 | $80 |
| 4,500 | $85 |
| 5,000 | $90 |
| 5,500 | $105 |
| 6,000 | $115 |
| 6,500 | $125 |
| 7,000 | $135 |
| 9,000 | $145 |
| 10,000 | $150 |
| 10,500 | $170 |
| 11,000 | $190 |
| 11,500 | $210 |
| 12,000 | $242 |
| 12,500 | $264 |
| 13,000 | $288 |
| 13,500 | $312 |
| 15,000 | $348 |
| 16,000 | $372 |
| 17,000 | $373 |
| 18,500 | $374 |
| 20,000 | $375 |
| 21,500 | $396 |
| 23,500 | $398 |
| 25,000 | $400 |
| 26,000 | $425 |
| 27,000 | $447 |
| 28,000 | $473 |
| 29,000 | $494 |
| 30,000 | $497 |
| 31,000 | $542 |
| 32,000 | $544 |
| 35,000 | $546 |
| 37,500 | $594 |
| 40,000 | $599 |
| 45,000 | $648 |
| 50,000 | $715 |
| 55,000 | $784 |
| 60,000 | $855 |
| 65,000 | $928 |
| 70,000 | $986 |
| 75,000 | $1,044 |
| 80,000 | $1,102 |
| 85,000 | $1,160 |
| 90,000 | $1,218 |
| 95,000 | $1,276 |
| 100,000 | $1,334 |
| 105,000 | $1,392 |
| 110,000 | $1,450 |
| 115,000 | $1,508 |
| 120,000 | $1,566 |
| 125,000 | $1,624 |
| 130,000 | $1,682 |
| 135,000 | $1,740 |
| 140,000 | $1,798 |
| 145,000 | $1,856 |
| 150,000 | $1,914 |
| >150000 | 150,000+: Custom Pricing |
3) Omnisend SMS credits
All Omnisend plans—Free, Standard, and Pro—include the option to purchase SMS credits. Both the Free and Standard plans offer a small number of one-time SMS credits as a trial.
In contrast, the Pro plan provides a more substantial benefit in “free” SMS credits, matching the amount of your monthly subscription. For example, if your subscription is $100 per month, you receive $100 in SMS credits. Additional credits are available for purchase.
SMS pricing varies significantly depending on the recipient’s country. Sending an SMS to the Netherlands costs $0.14 each, while sending one to the United States is much cheaper at $0.015 each—nine times less.
For detailed information on SMS credits and their usage, visit this page on Omnisend’s website.
Omnisend Discounts
Discounts for Paying Upfront
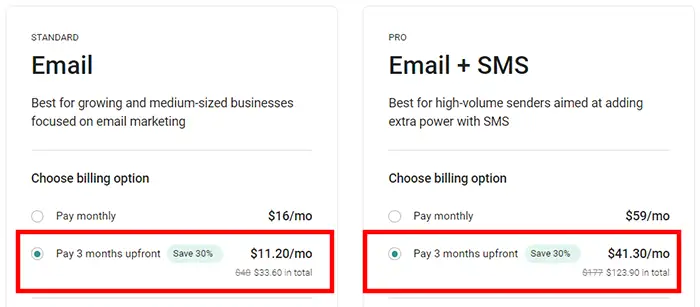
Omnisend offers a 30% discount when you pay for 3 months upfront. This is a generous offer, as most email marketing companies require a 12-month upfront payment to provide similar discounts. This makes it an attractive option.
However, this discount only lasts for 3 months. Most other email marketing companies offer annual billing, where the discount continues after the initial 12 months. Unfortunately, Omnisend’s discount is a one-time offer for new customers.
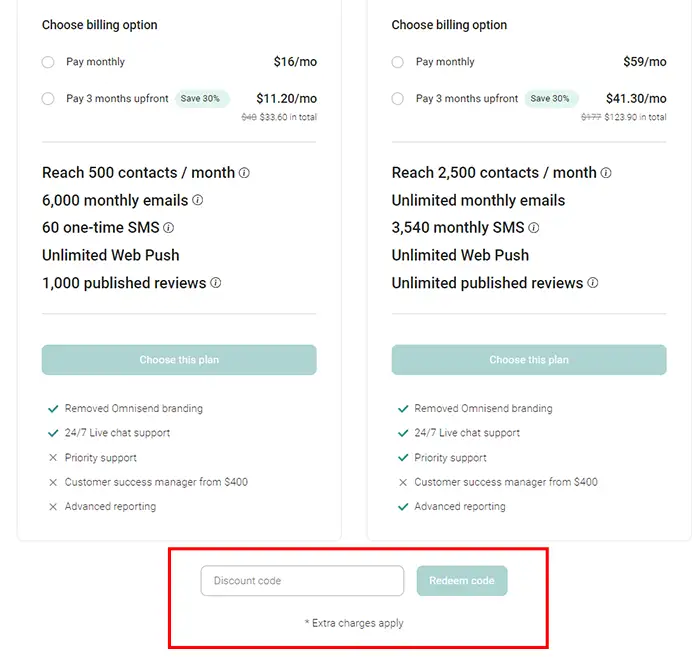
Omnisend Discount Code (10% Off)
Omnisend offers a special 10% discount on their Standard or Pro plans for the first 3 months of your billing cycle. You can find the discount code on this page.
The downside is that you can’t combine this discount code with the 30% discount for the 3-month billing cycle, so you have to choose one or the other.
To use the discount code, first create an account. Then go to the upgrade page inside the dashboard, where you can enter the discount code.
Pricing Structure
Omnisend’s pricing is based on the number of subscribers you have. While many email marketing platforms use a similar subscriber-based pricing model, some tools charge based on the number of emails you send. If your email volume is relatively low each month, you might consider Brevo, which price is based on email volume.
Understanding Contacts: Subscribers vs. Non-subscribers vs. Unsubscribers
Omnisend differentiates between three types of contacts:
- Subscribers – These customers have opted in for your email, SMS, or push notifications. They can receive both marketing and transactional messages. Omnisend charges for these contacts.
- Non-subscribers – These contacts may have purchased from your store but did not opt into your newsletter. If they didn’t select the newsletter checkbox, they are considered non-subscribers. Despite being “non-subscribers,” Omnisend still charges for these contacts because you can send them transactional emails. You can find more information on this page on Omnisend’s website.
- Unsubscribers – These were previously subscribers who actively unsubscribed. They can no longer receive promotional emails but can still receive some transactional communications like order confirmations. Omnisend doesn’t charge for these contacts. Mailchimp, for example, charges for unsubscribed contacts as well.
Further reading: Omnisend Pricing Plans 2024.
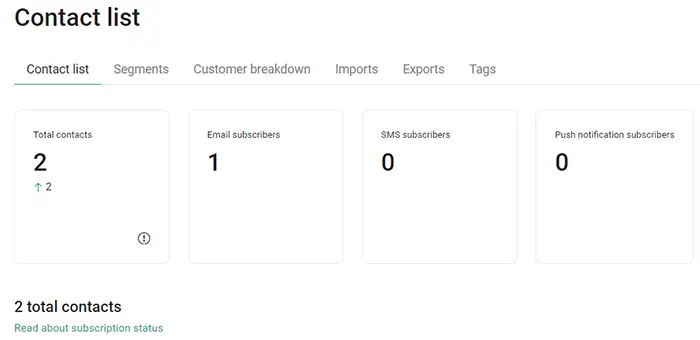
As illustrated in the example screenshot below, there’s a higher total contact count than the total number of subscribers in my list. This is because one of the two contacts unsubscribed and therefore I have a total of 1 email subscriber and 2 total contacts.
Price comparison
Omnisend vs Klaviyo
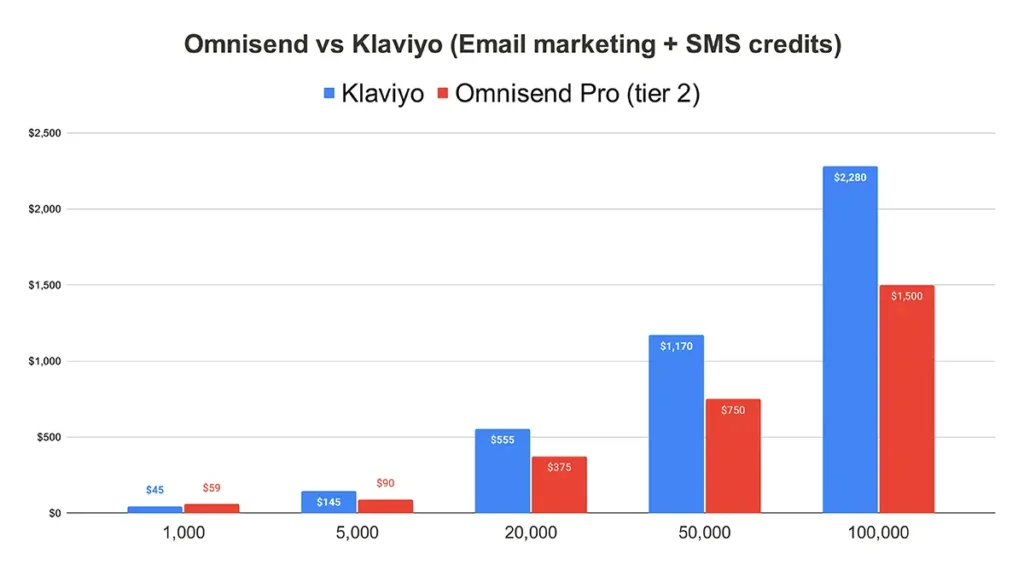
I have thoroughly compared Omnisend’s prices with Klaviyo’s, and the bottom line is that Omnisend is cheaper for both SMS credits and email marketing. For more details, including pricing graphs, check out my Omnisend vs Klaviyo comparison review.
Omnisend Review: Free Plan
Omnisend, like many other email marketing tools, offers a forever free plan.
Is it the best free plan though?
One great aspect of Omnisend’s free plan is that you get access to almost all its features, which is not common among email tools for free plan users. Additionally, they offer 24/7 email and chat support, which can be a game changer when setting up your email marketing because you will inevitably have questions (trust me).
The only downside of the free plan is the relatively low number of maximum contacts and monthly emails compared to some other email marketing tools. However, Omnisend is not like other email tools since its features are heavily focused on e-commerce companies. If you’re looking for an email tool for your e-commerce company, starting with Omnisend’s free plan might be the best choice. You’ll have ample time to set everything up with access to all its features and 24/7 support, without any limits on the number of days of support, unlike many other email marketing companies.
Bottom line? Is it the best free plan compared to others? Not necessarily, but it’s definitely one of my top favorites because of the access to all its features and 24/7 support.
| Forever free plan | ✔️ |
| Maximum contacts | 250 |
| Maximum monthly emails | 500 |
| Email automation | ✔️ |
| Support | ✔️ (24/7 Email & Chat support) |
| Remove branding | ❌ (Branding remains on forms and newsletters) |
| Signup forms | ✔️ (Unlimited signup forms & popups) |
| Landing pages | ✔️ |
| Can add custom domain | ❌ (Omnisend does not support custom domains) |
| Email scheduling | ✔️ |
| Create a website | ❌ (Omnisend is not designed for website creation) |
Omnisend Review: Newsletter Features
So, how impressed am I with Omnisend’s newsletter features? Before I answer that, let me clarify what I don’t mean by newsletter features:
- I don’t mean email automation features. Those are reviewed separately (see: Email Marketing Automation)
- I also don’t mean sign-up forms or landing page features. Those are covered separately (see: Popup & Opt-in Form Features)
- I don’t mean e-commerce features
- Nor reporting features (see: Reporting features)
So, many aspects do not fall under my definition of newsletter features. What does fall into this category is:
- User-friendliness: Does Omnisend use user-friendly language or a lot of jargon?
- Maximum contact or monthly/daily email limitations: What are my thoughts on these limitations? Would they be restrictive for me?
- Newsletter editor: How easy is it to send a simple newsletter or design a beautiful one?
- Custom fields: Custom fields allow flexibility in segmenting your audience. How flexible is Omnisend with custom fields, and how easy is it to create them?
- Email scheduling: Some email tools offer advanced scheduling features like timezone-based email scheduling. Does Omnisend offer such features?
- Google Analytics UTM builder: This is essential, but some email tools don’t provide a simple Google Analytics UTM builder. Does Omnisend include this?
- Segmentation features: While all email tools offer segmentation, some are easier to use or more flexible than others. How does Omnisend compare to other email tools in this regard?
User-friendliness
How would I rate Omnisend in terms of user-friendliness? I’d give it a solid 4-star rating (Good).
Here are five reasons why:
- No jargon used – While email marketing is inherently technical, Omnisend keeps jargon to a minimum, making it more accessible.
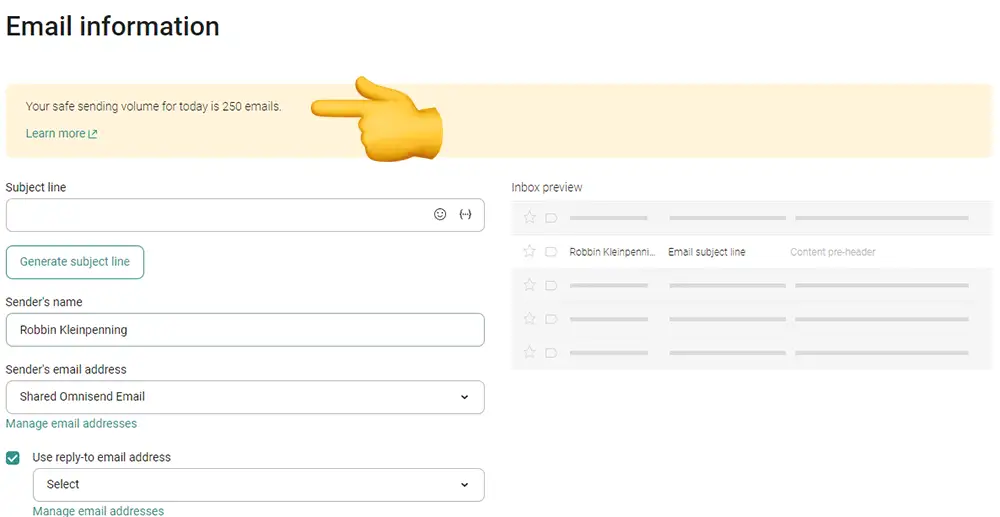
- Inbox preview feature – The inbox preview may not be groundbreaking, but it’s very useful for those new to email marketing. It quickly shows how changes, like adjusting the pre-header content, will appear.
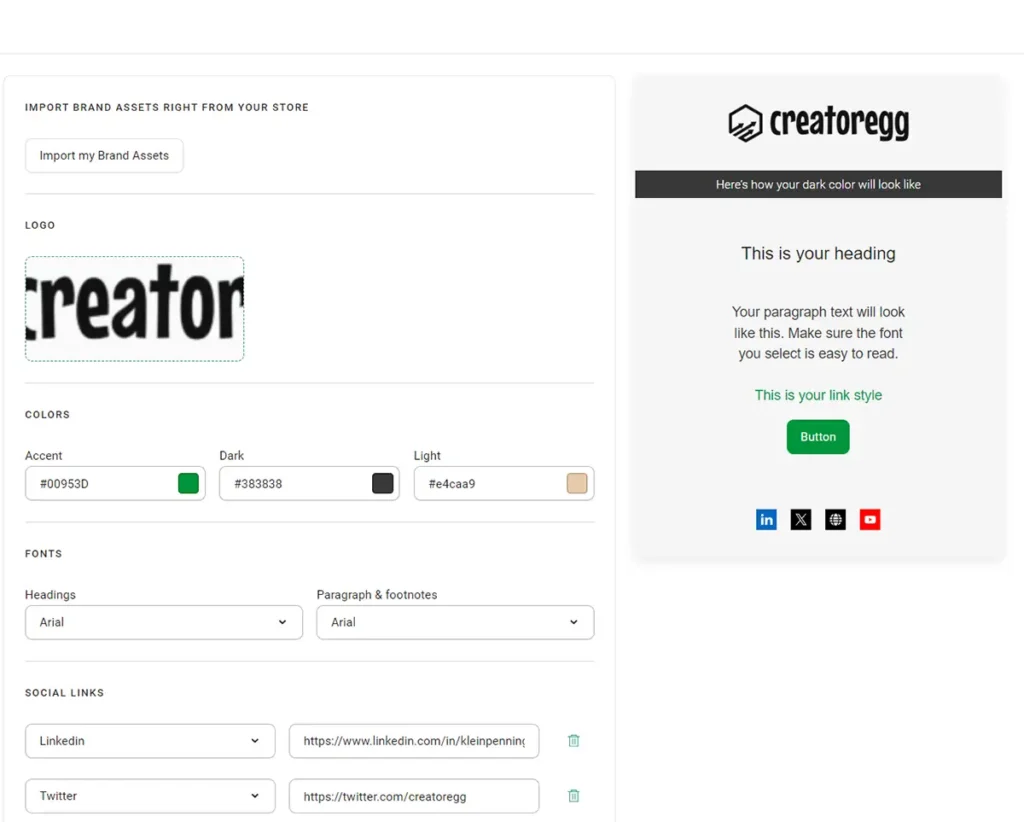
- Use your brand logo and colors for every email – Once you import your logo and choose your brand colors, every pre-designed template will automatically use these settings. This is similar to how social media and website links are managed.

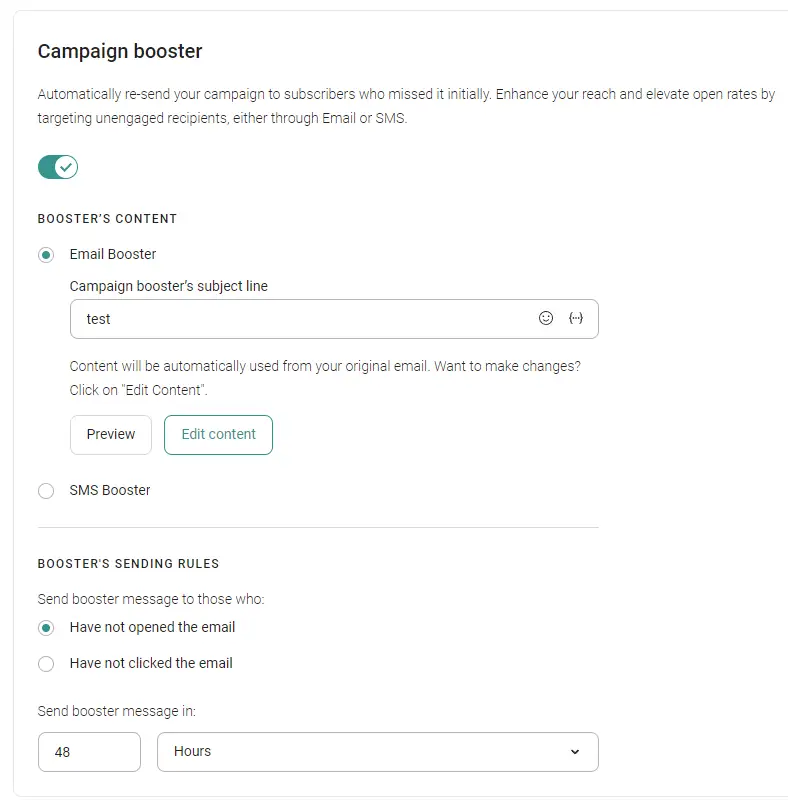
- Quickly set up for a re-send campaign (Campaign Booster) – The campaign booster feature lets you re-send the same campaign with a different subject line or content to the same recipients. This automation saves you time, as you don’t need to remember to go back and set it up manually.
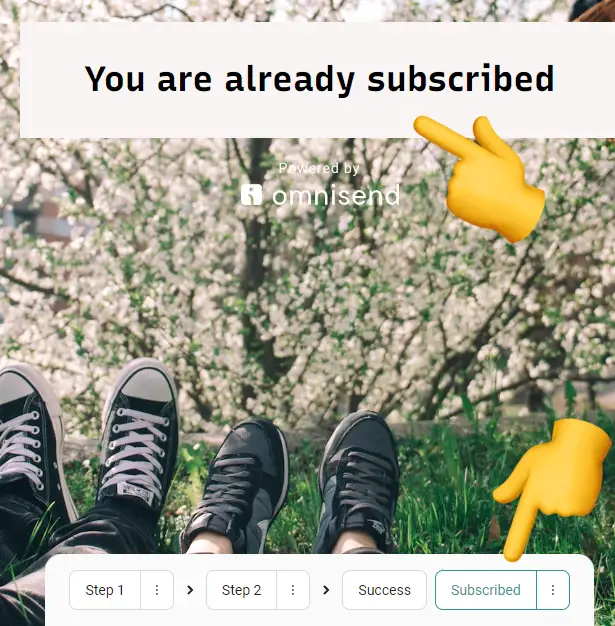
- Already subscribed contacts – Omnisend allows you to show a different success page for contacts who are already subscribed and submit their email address through your opt-in forms. This feature is relatively rare among email marketing platforms.
Maximum Contacts & Monthly Emails
Email marketing tools with various pricing tiers often limit the number of monthly emails you can send and the number of contacts you can maintain at each tier. While not all tools have these restrictions, many do. For instance, some might cap your email sends at ten times your contact limit. So, with a 1,000-subscriber plan, you could send up to 10,000 emails each month.
How does Omnisend do?
In short, Omnisend offers a tier with unlimited emails, which is ideal for high-volume senders. If you don’t need to send that many emails, the Standard tier might be sufficient. Also, there’s no cap on the number of contacts you can have in both the Standard and/or Pro plan.
My rating: 4-stars (Good)
Longer version: Omnisend uses a 12x contact limit restriction on its Standard tier. For example, if you have 5,000 contacts, you can send up to 60,000 emails (12 * 5,000). Omnisend’s Pro tier has no such restrictions, allowing unlimited emails.
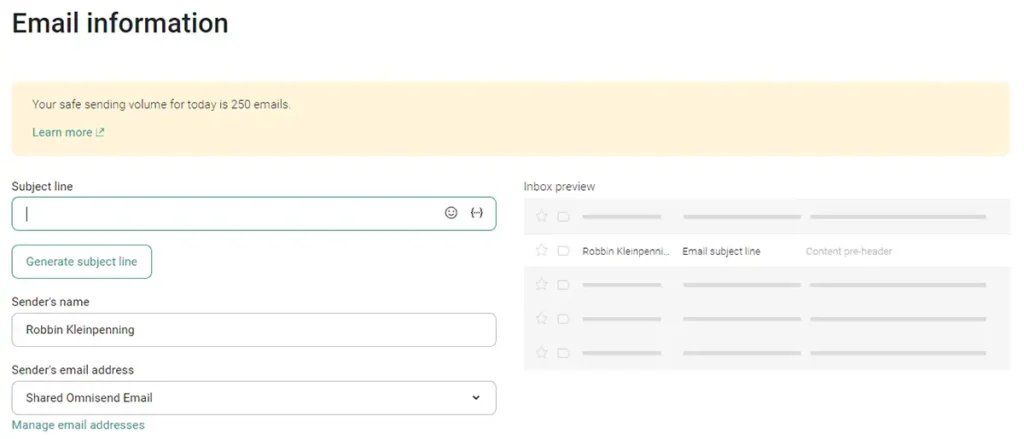
Omnisend also offers a feature called Safe Send Volume. Essentially, it prevents you from suddenly sending a massive volume of emails, like 100,000 in one day. This automated process gradually increases your email sending capacity to build a good sender reputation and ensure high email deliverability.
When creating a newsletter campaign, you’ll see a banner at the top showing your current safe sending volume. The Standard tier initially restricts you to 20,000 emails per day. This limit increases by 25% each time you reach it until you hit 400,000 emails. After that, it grows by 15% at each step. For more details about Omnisend’s Safe Send Volume, see this page.
Newsletter Editor
In this part of the review I’m exploring Omnisend’s newsletter editor features which means its email templates, and other features that are part of the process of creating an email newsletter and obivously also the newsletter editor itself.
Short version: the Omnisend newsletter editor offers essential features for creating and customizing email newsletters efficiently, similar to many other email marketing tools. The newsletter editor is, in most cases, not the primary reason to choose a particular email newsletter tool, as most email marketing tools offer great newsletter builders.
My rating: 4-stars (Good)
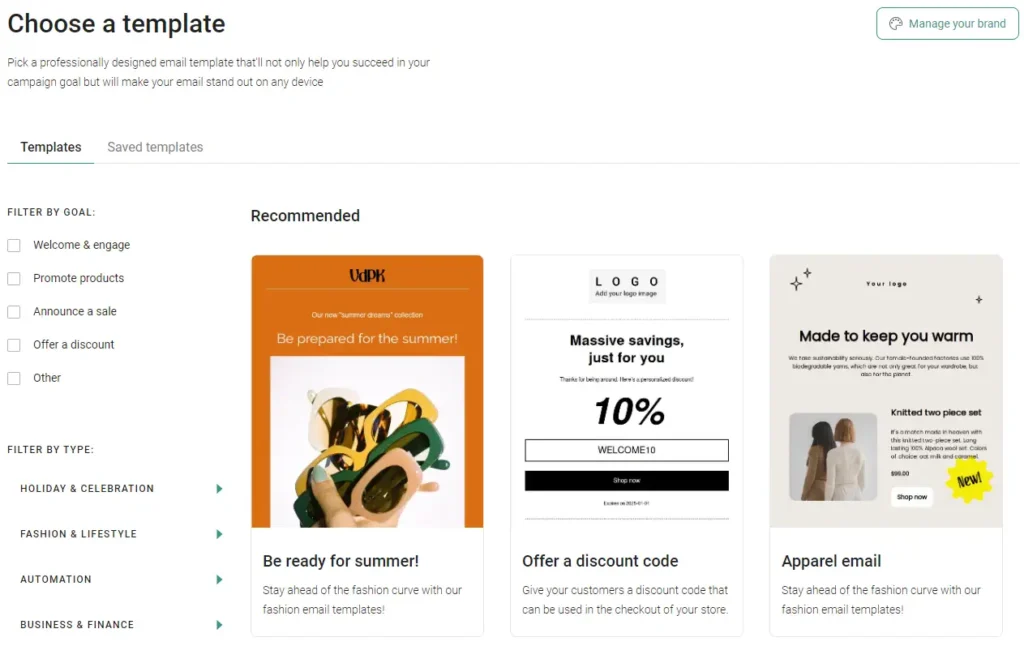
Longer version: Omnisend’s email tool is primarily geared towards e-commerce companies, so their pre-designed email templates are tailored to such businesses. Although I’m not sure of the exact number of templates, there are a lot!
However, I do miss an option to start from scratch. You can only select an email template; there doesn’t seem to be a way to begin with a blank template. While you can delete everything from a chosen template to start fresh, many marketers prefer to design their emails from scratch.
Another drawback is the inability to search for pre-designed templates by keyword. There are filters on the left-hand side, but no keyword search option.
A handy feature is the ability to choose your branded colors and fonts. Each time you select a new email template, it will automatically use your colors, fonts, and logo.
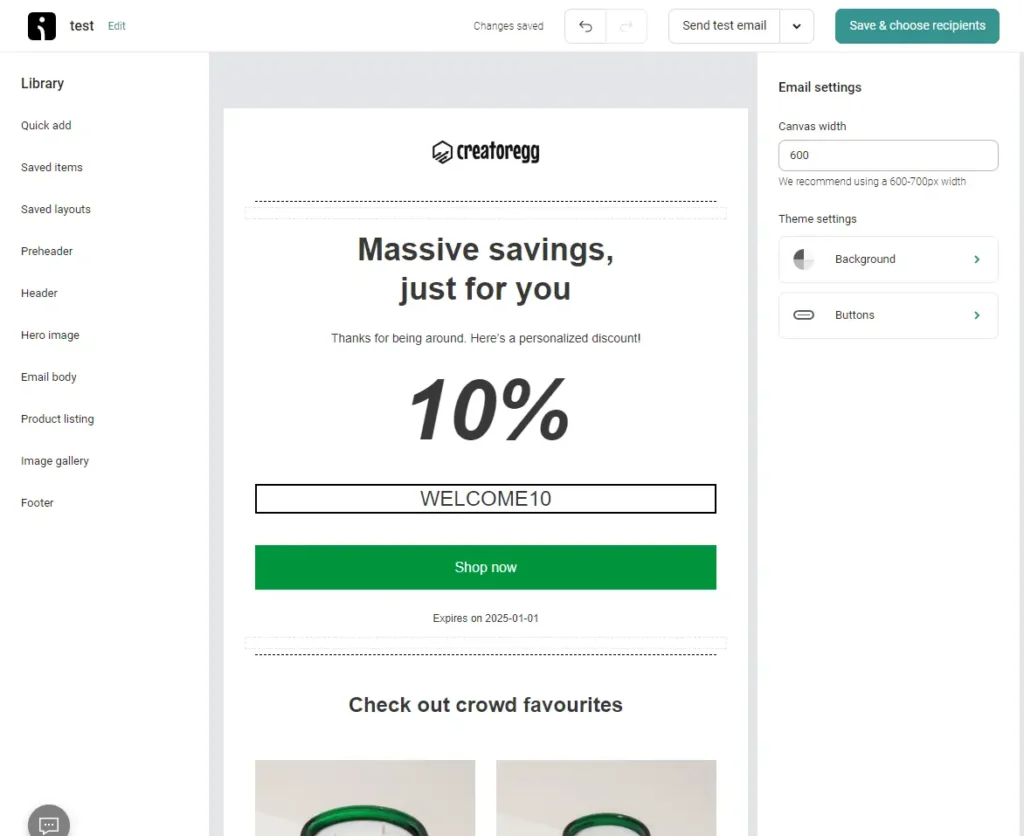
Once you’ve chosen an email template, you can start editing the content to your liking, as illustrated in the screenshot below. On the left-hand side, you’ll see a variety of tools.
The Omnisend newsletter editor is a straightforward and functional tool for creating email campaigns. Its drag-and-drop interface allows you to easily add and organize various elements within your emails. The sidebar includes options for adding text, images, buttons, and spacers, which can be arranged as needed.
You can customize the preheader and header sections for branding purposes and include a hero image to make a strong visual statement. The main email body can contain text, media, and product listings, which is useful for e-commerce businesses. Additionally, users can insert image galleries and create a tailored footer with additional information or links.
The editor allows adjustments to the canvas width to ensure the email looks good on different devices. Theme settings enable changes to the background and button styles to match your brand’s look. Before finalizing the email, users can send a test email to check the formatting and content. Personalization options, such as inserting customer names or discount codes, are also available to make the emails more relevant to recipients.
Overall, the Omnisend newsletter editor offers essential features for creating and customizing email newsletters efficiently, similar to many other email marketing tools. The newsletter editor is, in most cases, not the primary reason to choose a particular email newsletter tool, as most email marketing tools offer good newsletter builders.
My rating: 4-stars (Good)
Email Scheduling
Feature description: Some email tools provide advanced email scheduling features, such as sending emails in batches or at specific times, regardless of your audience’s time zone. Additionally, some tools offer send time optimization, determining the most likely time when your subscriber will open the email based on their previous interactions with your emails.
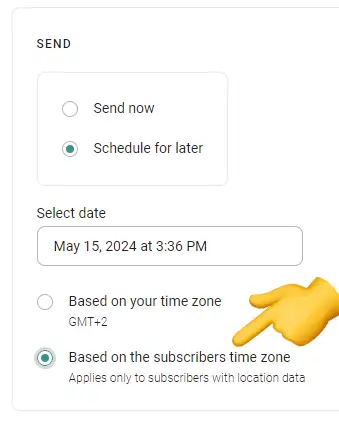
My evaluation: Besides the standard ‘schedule for later‘ option that every newsletter tool offers, Omnisend also allows you to schedule emails based on the subscriber’s time zone. This feature is particularly useful if you have a global audience. Keep in mind that not every email tool offers this option.
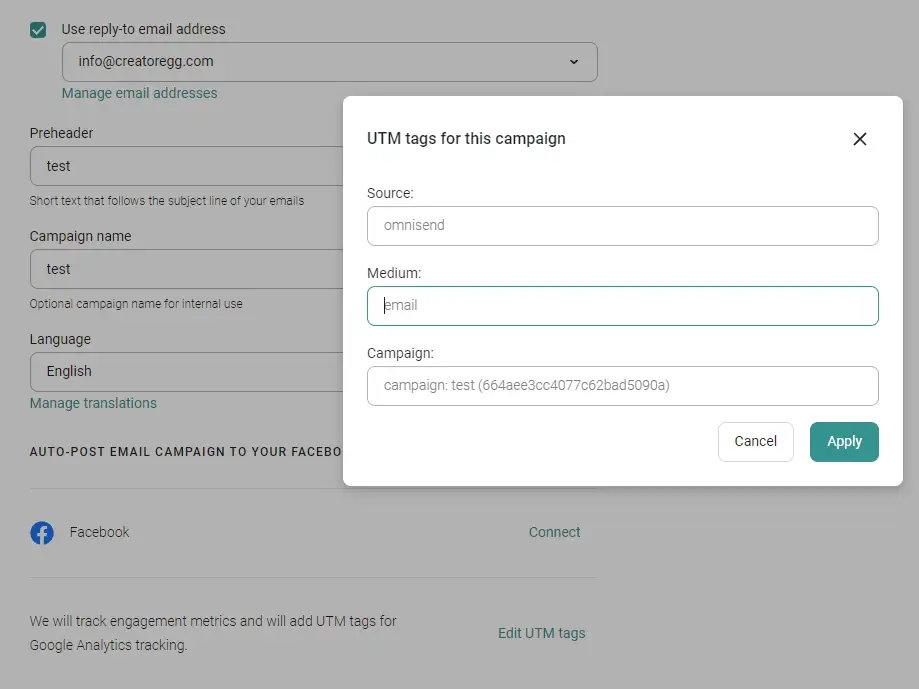
UTM tags for Google Analytics
When you send a newsletter, whether it’s a regular campaign or an automated email, Omnisend will automatically add UTM tags to the links in your emails, making it easy to track them. For more information on how this works, see this page on their website.
Omnisend Review: Email Marketing Automation
Given Omnisend’s focus on e-commerce companies, I will evaluate their email marketing automation features from an e-commerce perspective.
What does an e-commerce business need in terms of email marketing automation features?
While I appreciate advanced automation features like complex split testing, the most impactful features are often the basic ones, as many businesses haven’t yet implemented them.
The essential email automations that can generate about 80% of your email automation results are:
- Welcome Series (3-10 emails)
- Site Browsing Abandonment Campaign (1-3 emails)
- Product Browse Abandon Campaign (3-4 emails)
- Abandoned Cart Recovery
- Abandoned Checkout Recovery
- Post-Purchase Follow-Up (3-4 emails)
- Win-back Campaign (2-8 emails)
- VIP Campaign (3-5 emails)
- Sunset Campaign (1 email)
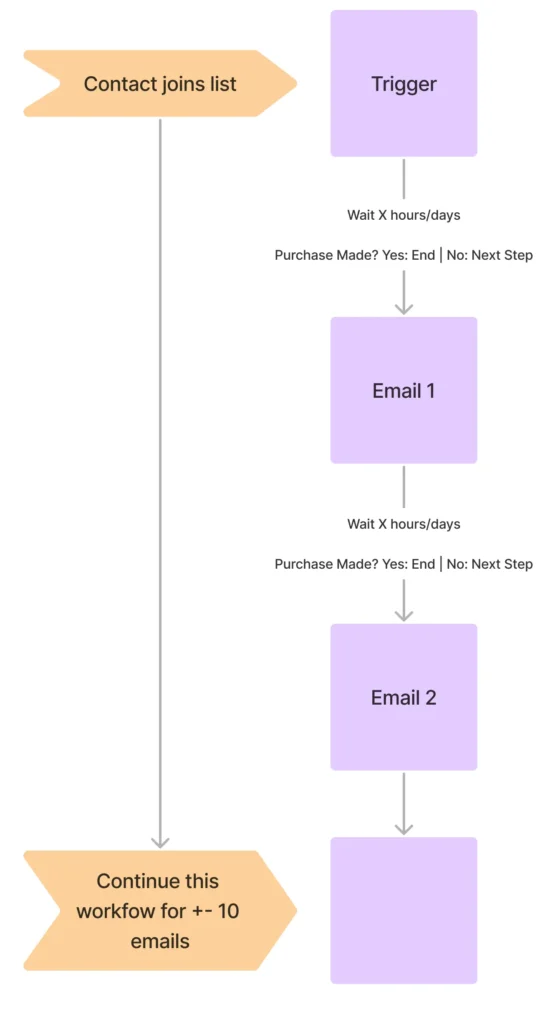
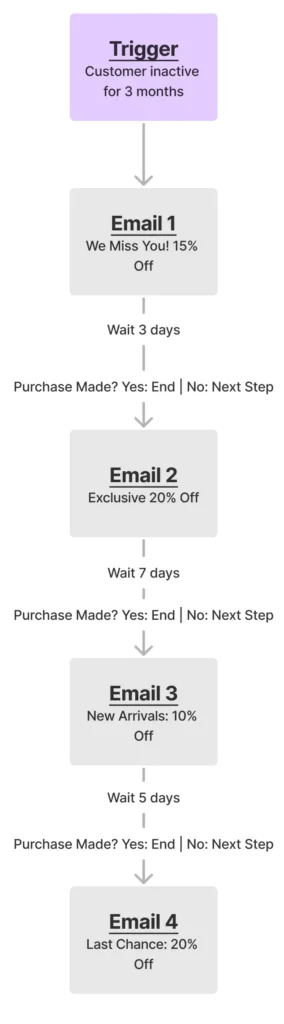
Welcome Series
The welcome series automation triggers when someone joins your list. For e-commerce businesses, the most common use case for new subscribers is a discount pop-up (e.g., “Join our newsletter for 10% off”).
The primary goal of this welcome series automation is to educate new subscribers about your brand and products, build initial trust, and encourage them to make their first purchase.
This welcome series should consist of around 10 emails. The content of these emails should focus on:
- Educating future customers about your brand and products.
- Building initial trust with the subscribers.
- Encouraging subscribers to make their first purchase.
Whenever someone makes their first purchase during this automation (e.g., after email 4), they should ideally be filtered out of the series. Since the goal is to ensure subscribers make their first purchase, once this goal is achieved, they should no longer receive the remaining emails in the series.
Below, you can see an example template for a welcome series.
Creating a Welcome Series in Omnisend
So, can Omnisend do the things we just described above?
- Can Omnisend trigger the automation when someone joins the list using a popup?
Yes, Omnisend allows us to start an automation (workflow, as Omnisend calls it) when someone joins your list using a specific popup. The setup process for creating such a workflow is relatively easy and doesn’t require any technical knowledge.
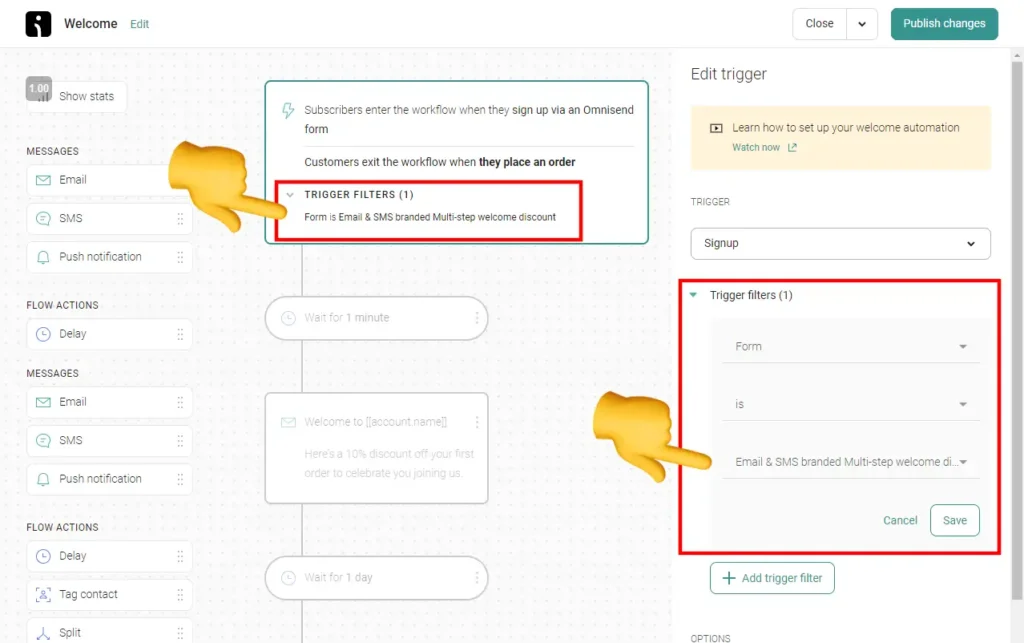
- Can Omnisend support a series of 10 emails?
Yes, Omnisend supports up to 10 emails for a welcome series. It might even be unlimited, as I’m not aware of any cap on the number of emails you can add. Generally, most email marketing tools offer unlimited emails for a welcome series.
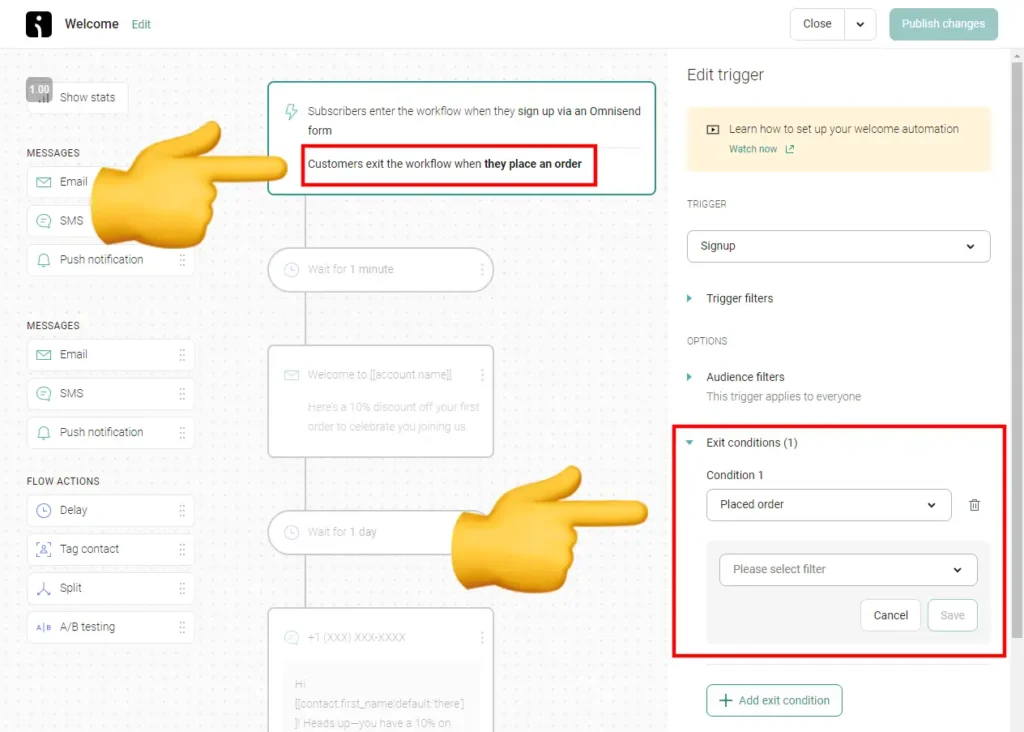
- Does Omnisend allow filtering out subscribers who make their first purchase during the series?
Yes, Omnisend allows you to automatically remove subscribers from the workflow once they place an order, as shown in the screenshot below.
So, in terms of a welcome series, Omnisend does exactly what you need for an e-commerce company.
My rating: 5-stars (Great)
Site Browsing Abandonment Campaign
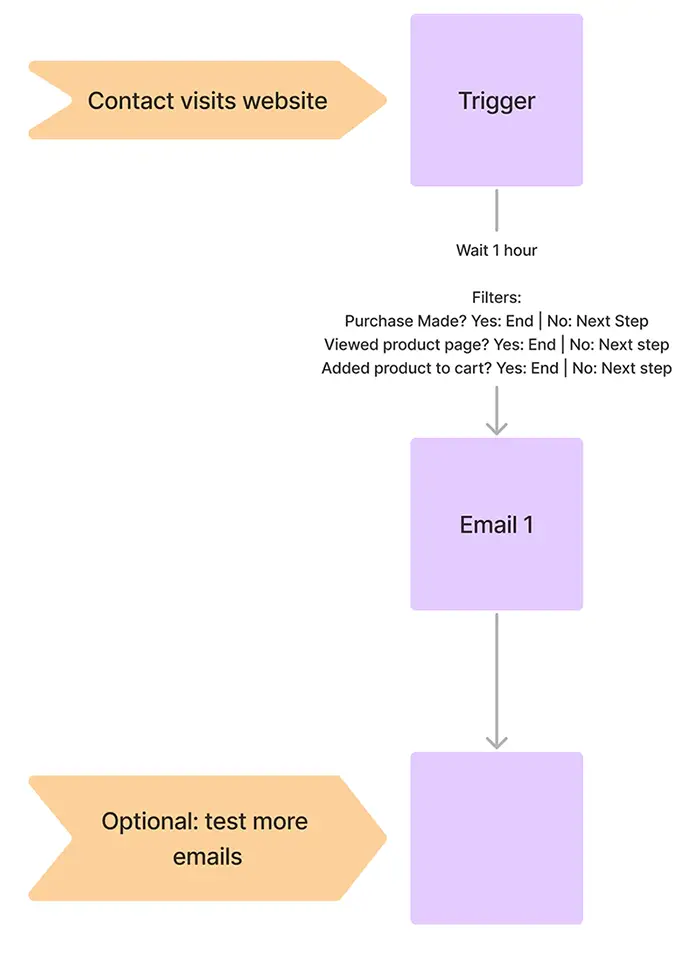
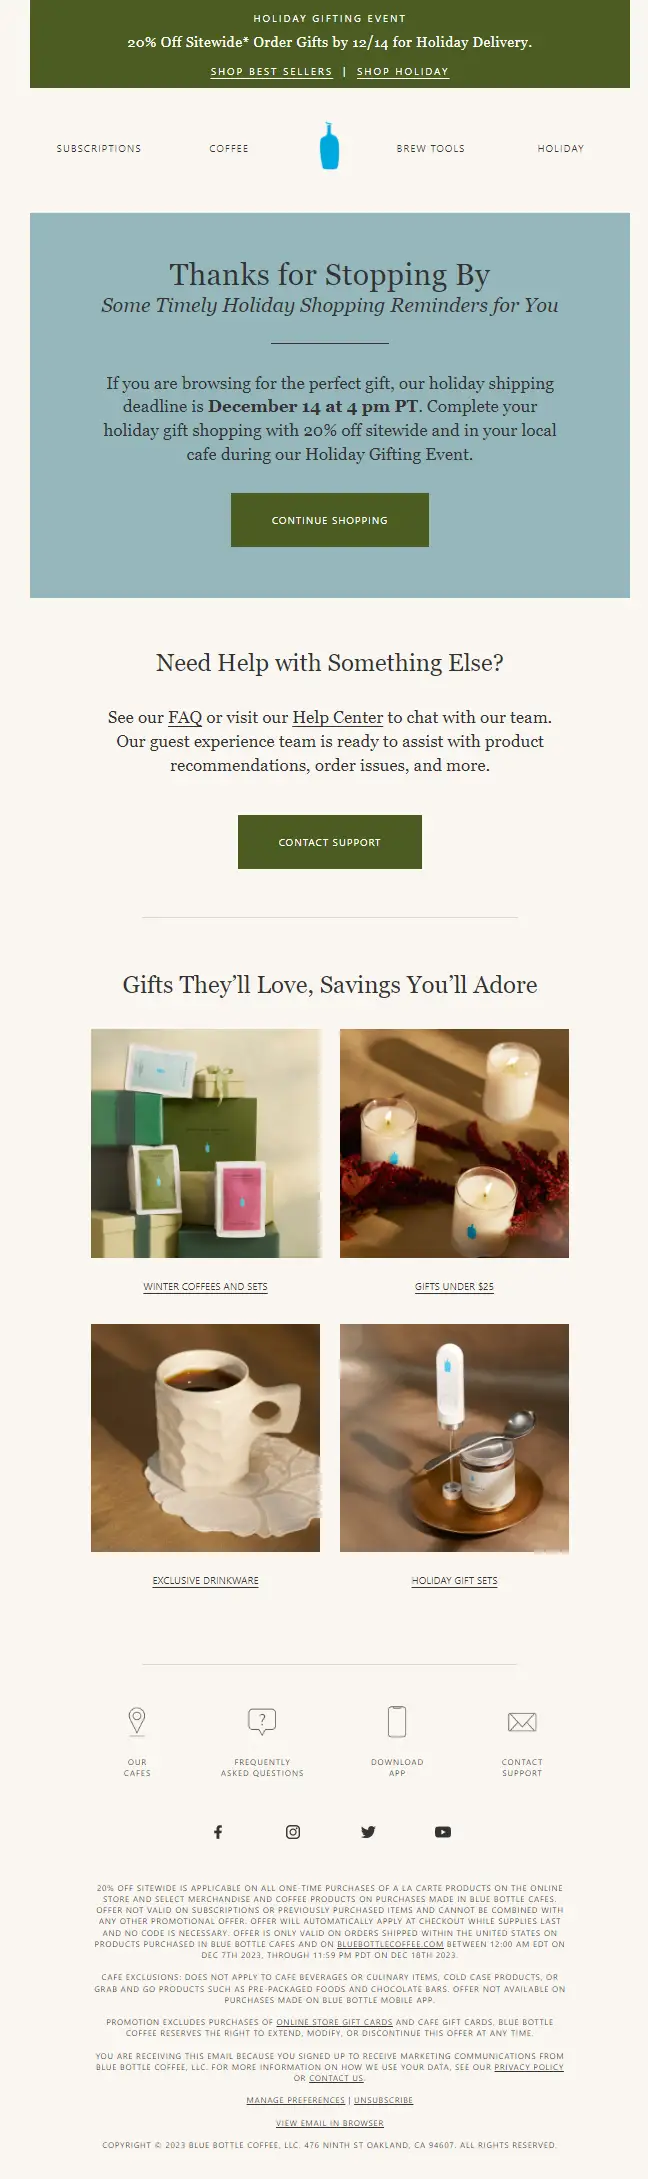
As an e-commerce business, it’s crucial to re-engage visitors who leave your website without making a purchase. Below is an example template for a Site Browsing Abandonment Campaign.
Creating a Site Browsing Abandonment Campaign in Omnisend
I tested Omnisend’s capabilities to set up a Site Browsing Abandonment Campaign, particularly focusing on its integration with Shopify. Here’s what I found:
Shopify Integration: Omnisend integrates seamlessly with Shopify. Once you install the Omnisend app, the site tracking feature activates automatically, enabling you to start capturing visitor behavior without any additional setup. For other platforms like WooCommerce, the integration process may vary (I haven’t tested those), but Omnisend offers comprehensive documentation to assist with different setups.
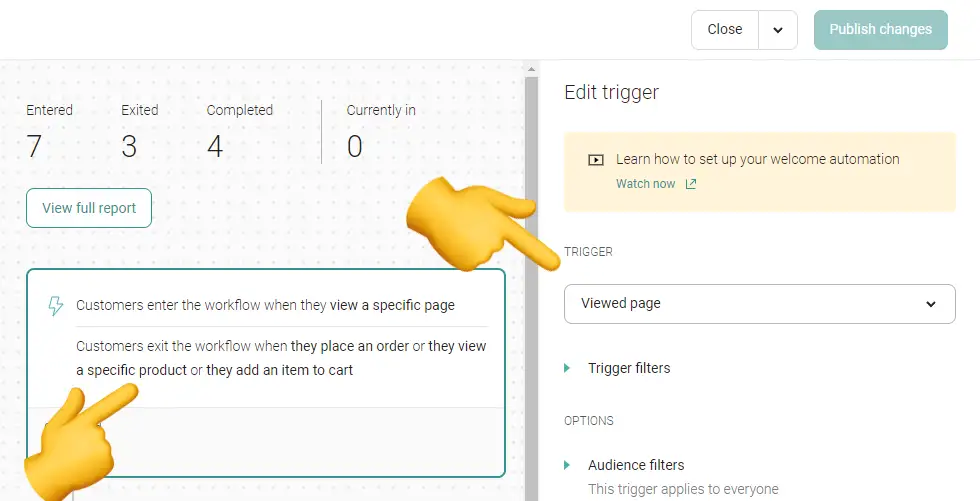
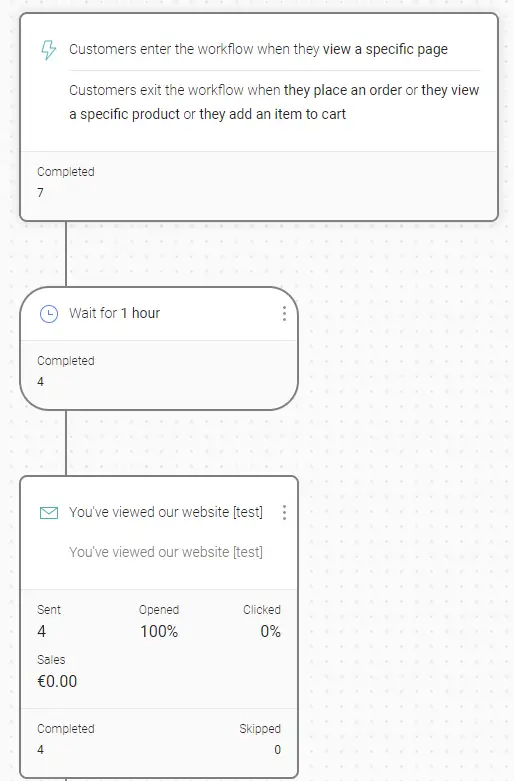
Tracking Capabilities: As shown in the screenshot below of Omnisend’s workflow builder, I configured this workflow to trigger when someone views a page on our website. I also set up ‘exit conditions,’ where Omnisend removes them from the workflow if they view a product page, place an order, or add an item to their cart.
Note that you need to add a waiting action within your workflow (e.g., a 1-hour delay as shown in the example) so Omnisend can exclude contacts once they visit a product page.
Omnisend provides the necessary tools to create and run a Site Browsing Abandonment Campaign effectively. Its integration with Shopify ensures an easy setup for site tracking.
My rating: 5-stars (Great)
Below is an example Site Browsing Abandonment Campaign email.
Product Browse Abandon Campaign
As an ecommerce business, re-engaging with visitors who viewed product pages but didn’t purchase anything is defitenly helpful. Below you can see an example template for a Product Browsing Abandonment Campaign.
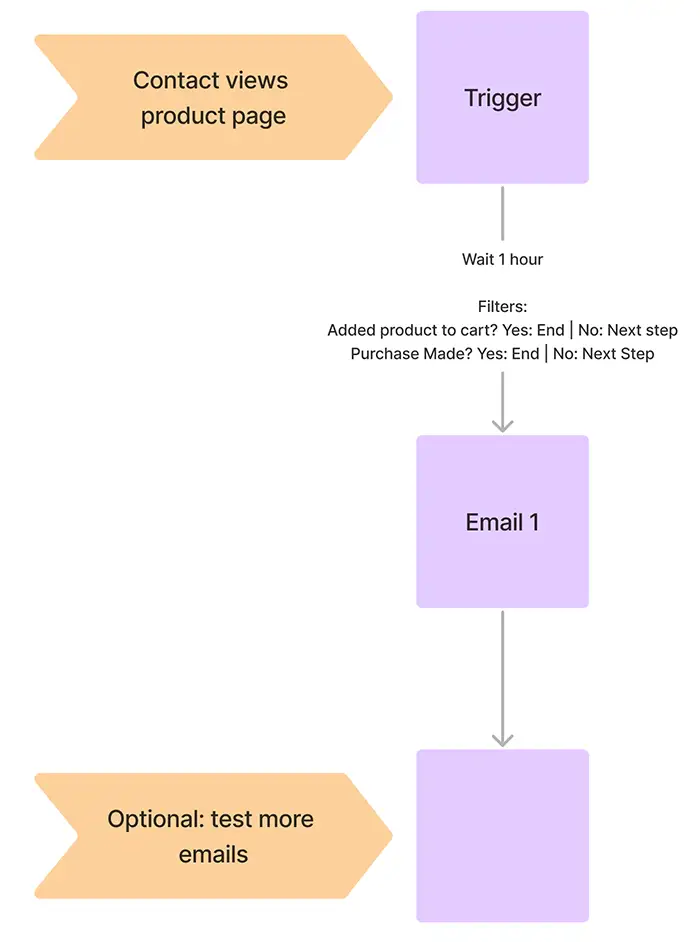
Creating a Product Browse Abandon Campaign in Omnisend
I’ve tested Omnisend’s capabilities to set up a Product Browse Abandonment Campaign, focusing on its integration with Shopify. Here’s my experience:
Omnisend integrates with Shopify. Once the Omnisend app is installed, the site tracking feature becomes active automatically, allowing you to start capturing visitor behavior without additional setup. For other platforms (e.g., WooCommerce), the integration process may differ, but Omnisend provides documentation to assist with various setups.
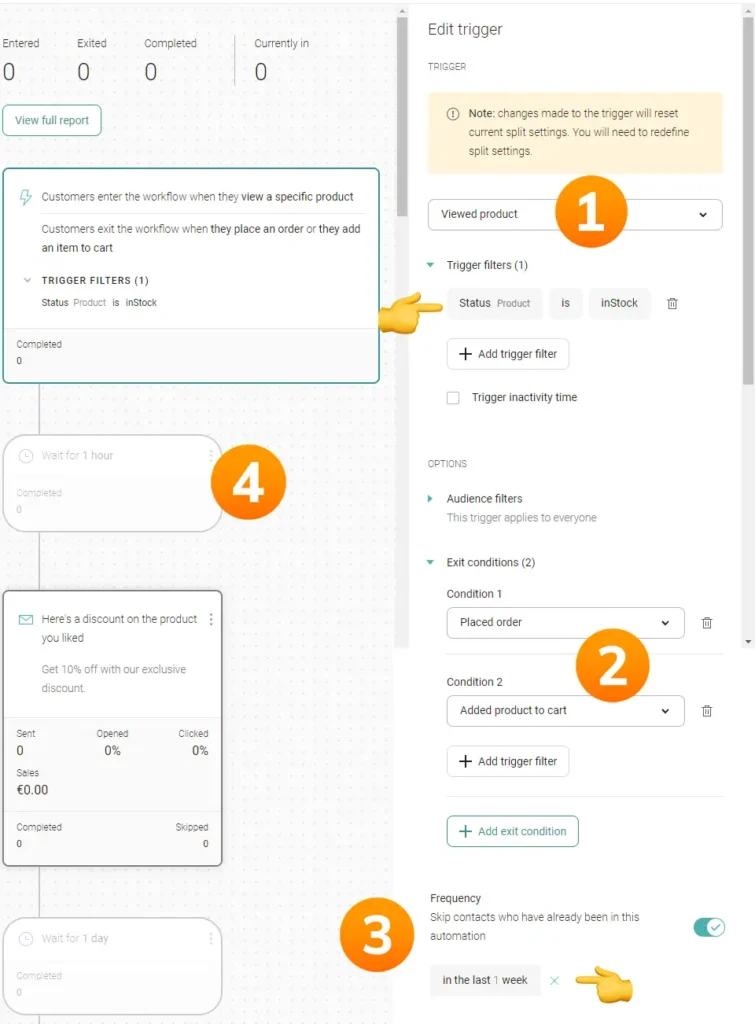
Allow me te explain the screenshot above, which is a screenshot of Omnisend’s workflow builder.
- I’ve set this workflow up to be triggered once someone views a product page on our website. Also, I’ve added an extra filter that this workflow should only be triggered when the status of the product is in stock since you don’t want to email people reminding them to purchase the product of it is out of stock.
- I’ve set up these so called ‘exit conditions’ where Omnisend removes the contact from the workflow if they add a product to their cart, or place the order since I want to send them a different email/more personalized email if they would do that and didn’t purchase the product.
- Omnisend allows you to skip contacts who’ve been in this automation before. It’s on 1 week as default.
- Don’t forget to add waiting actions at the start of yoru automation before sending emails. Else someone will receive the abandoment email immediately after browsing a product page, which wwould be weird.
Anyhow, the bottom line is that Omnisend allows us to set up a Product Browse Abandon Campaign.
My rating: 5-stars (Great)
Below you can see an example email for a Product Browse Abandon Campaign.

Abandoned Cart Recovery
Abandoned cart and checkout campaigns usually have the highest conversion rates, making them crucial for e-commerce businesses to set up properly.
Below is an example template for a Abandoned Cart Recovery Campaign. It might seem confusing at first, but the idea is to send personalized emails based on the product a contact has added to their cart. For instance, you could create personalized abandoned cart emails for the most important products in your store to highlight their key benefits.

Creating an Abandoned Cart Recovery Campaign in Omnisend
Omnisend offers 50 pre-built workflow templates. As shown in the screenshot below, if you search for “cart,” you’ll find five pre-built templates ready to use.
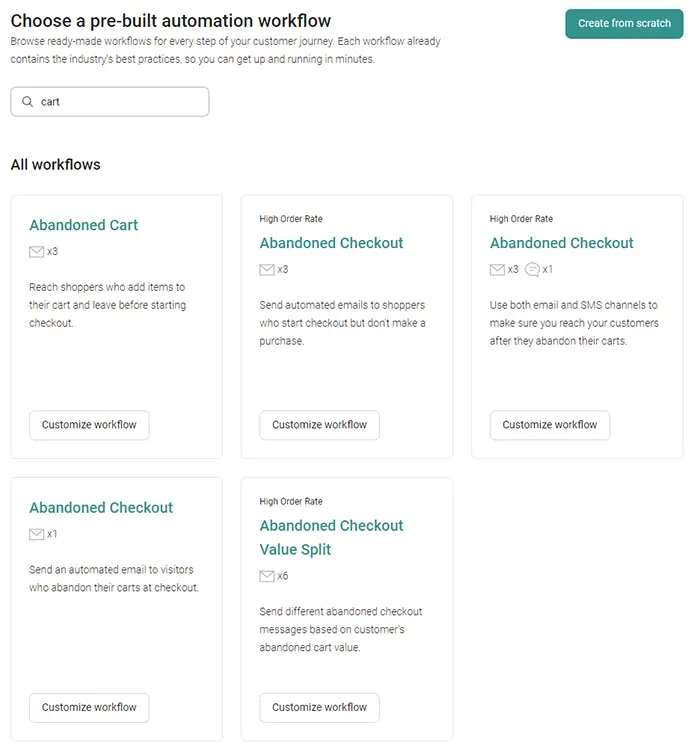
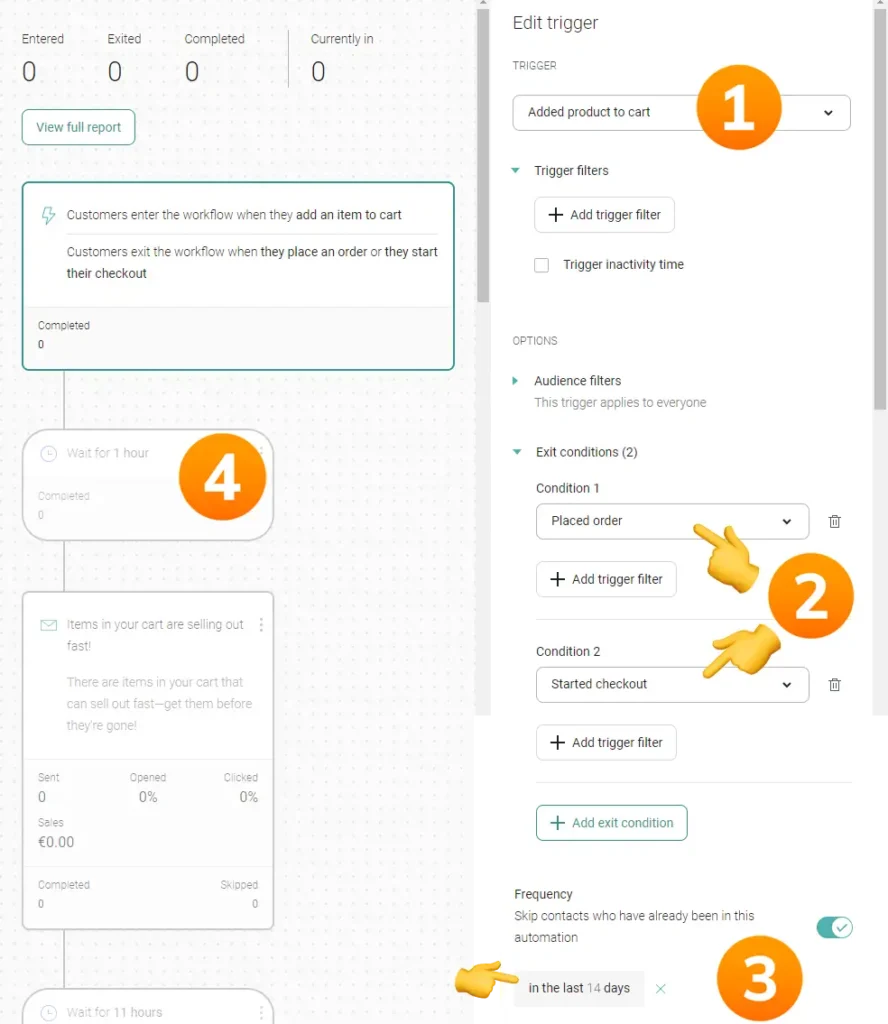
Here’s an explanation of the screenshot above, which shows Omnisend’s workflow builder:
- I set this workflow to trigger when someone adds a product to their cart.
- I’ve set up these so-called ‘exit conditions’ where Omnisend removes the contact from the workflow if they start the checkout process or place the order.
- Omnisend allows you to skip contacts who have been in this automation before. In this example, I set it so that contacts who have been in this automation in the last 14 days won’t be emailed again.
- Remember to add waiting actions at the start of your automation before sending emails. Otherwise, someone will receive the abandonment email immediately after adding a product to their cart, which would be odd.
In conclusion, Omnisend enables us to set up a Cart Abandon Campaign effectively.
My rating: 5-starts (Great)
Abandoned Checkout Recovery
The checkout recovery campaign is similar to the cart recovery campaign (see above), but I recommend setting up a separate workflow to measure the different conversion rates of the two.
Creating an Abandoned Checkout Recovery in Omnisend
The setup process is the same as the cart recovery campaign with a few minor adjustments:
- Instead of using the “Added to cart” trigger, use the “Started checkout” trigger.
- Instead of two exit conditions like in the cart recovery campaign, use only one: the “Placed order” exit condition.
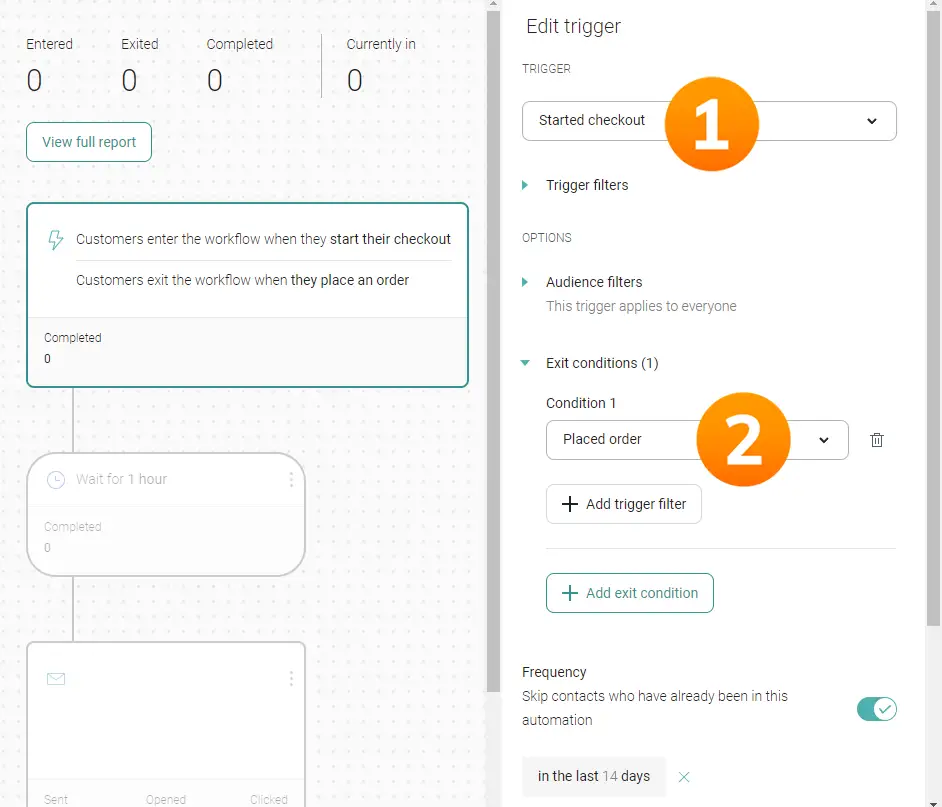
My rating: 5-starts (Great)
Post-Purchase Follow-Up
In addition to standard post-purchase emails like order confirmations, shipping updates, and delivery notifications, you can also send more personalized post-purchase emails.
The purpose of post-purchase emails can be multifaceted. Firstly, you want to ensure customers feel good about their purchase so they don’t regret buying from you. Reinforce that they made a great decision by highlighting product benefits and sharing customer testimonials and success stories.
Additionally, it’s a perfect time to provide tips and tricks on how to use your product. For instance, if a customer buys a non-fiction book, you could send tips to help them get started with the book’s content, such as how to achieve the best results. If you sell washing machines, you could share a video or how-to guide on installation.
Furthermore, selling to existing customers is often easier than acquiring new ones. So, take this opportunity to cross-sell your other products!
Lastly, ask for a review. Simply requesting a review may not be enough; you should offer some incentive for them to leave feedback.
Creating a Post-Purchase Follow-Up in Omnisend
The bottom line: Omnisend allows us to send post-purchase emails.
The setup process for a post-purchase workflow is similar to other workflows we’ve set up. In this case, you would use the “Placed order” trigger to start the workflow. There are no exit conditions like before since we want everyone to receive the post-purchase emails.
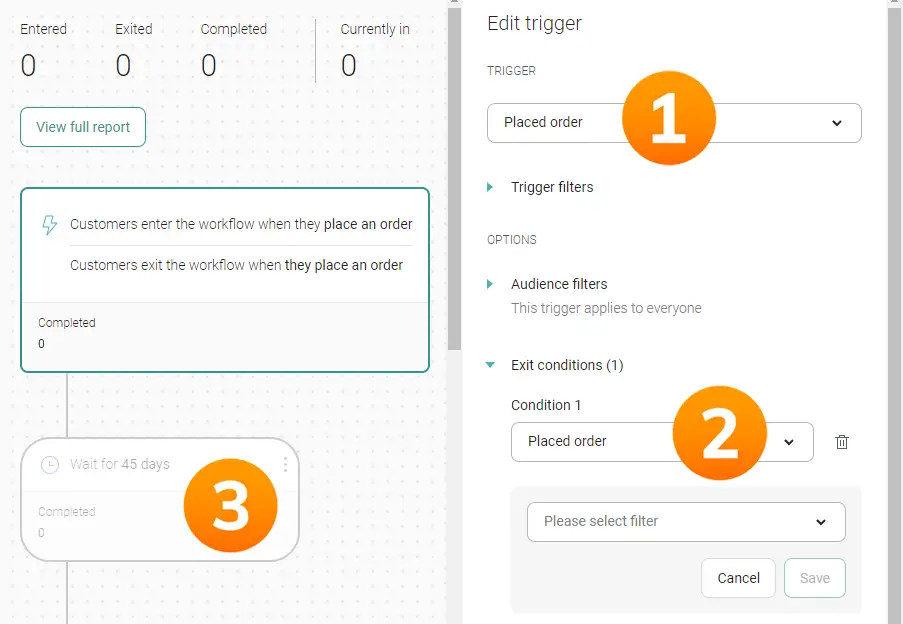
Win-back Campaign
The goal of a Re-Engagement Campaign is to encourage customers who haven’t purchased anything in a while to buy another item from your store, thereby increasing their lifetime value (LTV). Here is an example template:
The screenshot below shows a Re-Engagement Campaign example within Omnisend.
- The workflow is triggered when someone places an order in your store.
- Add an exit condition to remove the contact from this workflow once they make a purchase.
- Set a wait period of X days (e.g., 45 days) before sending them a Re-Engagement email.
My rating: 5 stars (Great)
VIP Campaign
The goal of the VIP campaign is to reward and nurture your best customers, encouraging them to spend more in your store.
The first step is to create segments of your VIP customers. Examples of VIP segments are:
- Big spenders
- Who are they: Imagine you’re a furniture company with customers who spend a lot on your products but only purchase 1 to 3 times a year.
- Your goal: Turn big spenders into frequent spenders. Offer them early access to limited edition products or services, and remind them of the benefits of being a VIP. Promote related or complementary products to encourage new purchases.
- Frequent spenders
- Who are they: Perhaps you’re a clothing brand with customers who buy often but don’t spend large amounts.
- Your goal: Increase their average yearly spend. Offer exclusive discounts on related products, early access to complementary items, or admission to exclusive events.
- Blended
- Who are they: If you’re a cosmetic brand with customers who purchase frequently and spend a lot, create a blended segment.
- Your goal: These are your best customers. Reward and nurture them with perks like 1-day shipping and exclusive access to new products, services, or events.
- Potential VIPs
- Who are they: All businesses can benefit from a segment that identifies potential VIPs. These customers have purchased or spent slightly less than your regular VIPs.
- Your goal: Move potential VIPs to one of your VIP segments like Big Spenders, Frequent Buyers, or Blended. Show them the benefits of your loyalty program and offer VIP discounts on their next purchase to encourage them to join your VIP community.
Create the VIP segment ‘Big Spenders’ in Omnisend
In short: Unfortunately, it is not possible to create a big spenders segment within Omnisend. This also means the blended segment cannot be created.
Longer version: To create a big spenders segment, I want to identify contacts with a revenue slightly higher than my average customer’s yearly spend. For example, if I know my customer’s average yearly spend, I would set up a filter like this:
Revenue is greater than $120 in the last 300 daysHere is where I encountered a limitation with Omnisend. Omnisend does not offer the option to filter contacts based on the amount of money spent in your store (I confirmed this with their support).
Create the VIP segment ‘Frequent Spenders’ in Omnisend
In short: It is possible to create a frequent spenders segment in Omnisend.
To create a VIP segment of frequent spenders in Omnisend, you need to create a new segment. Use a number slightly higher than your average customer’s number of orders per year for your segment conditions:
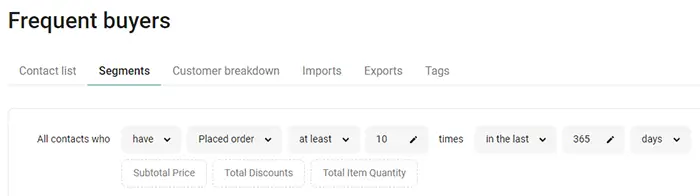
Create the VIP segment ‘Potential VIPs’ in Omnisend
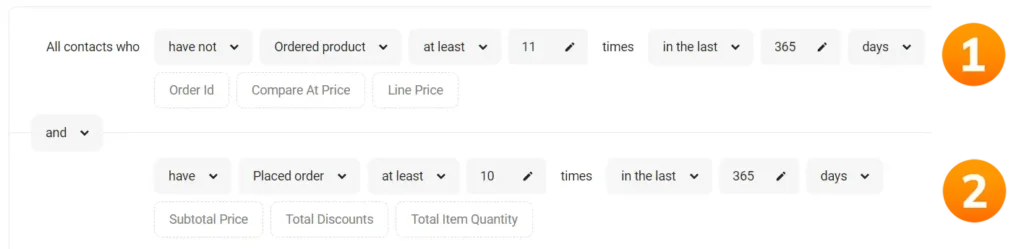
Longer version: Suppose your average customer’s number of orders per 365 days is 10, and your VIP segment condition for Frequent Spenders is at least 11 placed orders within 365 days. Then, a potential VIP would be a customer who has placed 10 orders in that period. One more order would push them into the VIP Frequent Spenders category.
The segment you want to create is:
Exlude all contacts that are in VIP segments

and

Include all contacts that have X orders or more in the last X days
The limitation with Omnisend is that it doesn’t allow you to exclude other segments when creating a segment. Here’s a workaround (see screenshot below):
- The first condition is to exclude contacts that have ordered 11 times or more, which essentially represents the ‘Frequent Buyers’ Segment. It would be simpler if Omnisend allowed excluding a segment directly, but this isn’t possible.
- The second condition is to find contacts that have ordered 10 times in the last X days, identifying your Potential VIPs.
Sunset Campaign
A “Goodbye” or “Sunset” campaign is an effective strategy for maintaining a healthy email list by removing unengaged subscribers. This campaign also serves as a final attempt to re-engage them before you unsubscribe them, ensuring you aren’t paying for inactive contacts on your monthly Omnisend bill.
Let’s see if Omnisend can facilitate this …
Create a Sunset Segment in Omnisend
Short version: Yes, Omnisend allows us to set up a sunset segment, but it’s not fully automated. There are some manual steps involved, which I’ll detail below. Because of this, I’ll rate this feature 3 stars (It’s fine).
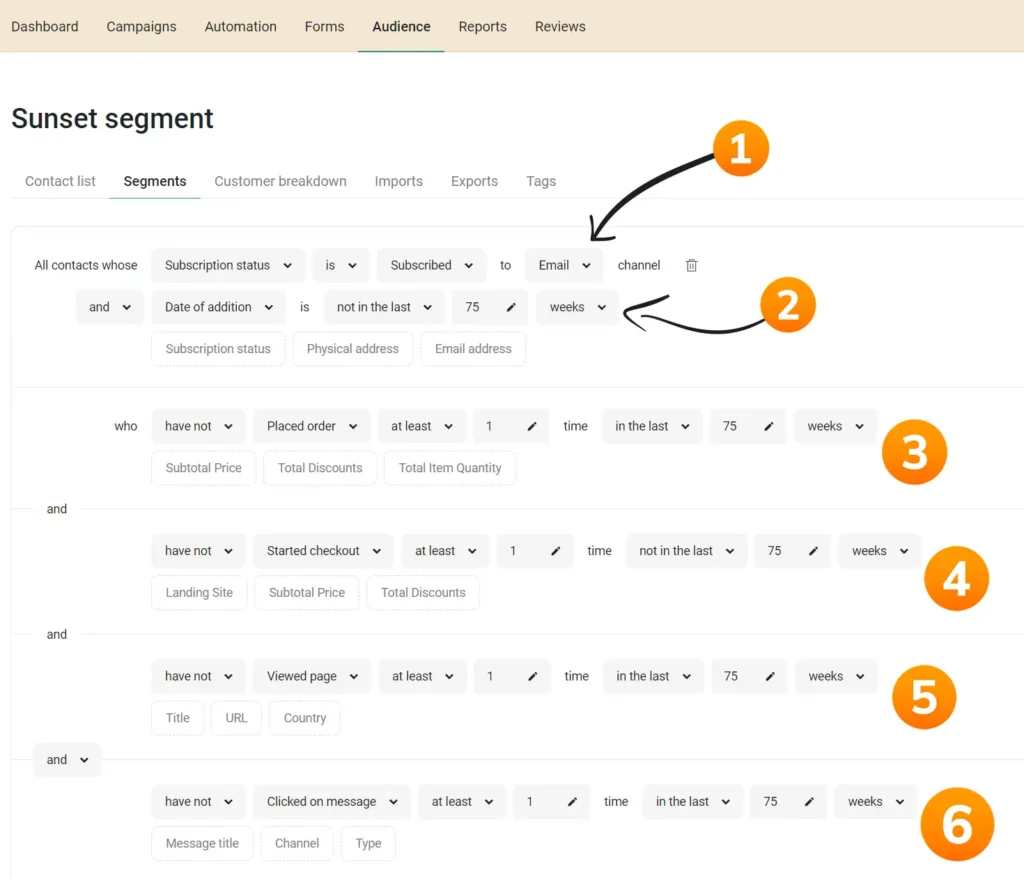
Longer version: In the screenshot below, you can see that Omnisend provides the features to create a segment of “inactive” customers. Here’s a detailed explanation of how to create this segment. Note that this is an example sunset segment and you can customize it to fit your business needs.
- Subscribed Contacts: First, ensure only contacts subscribed to your email list are included.
- Inactive Subscribers: Add a condition to include only those who haven’t been added to your email list in the last X weeks. For instance, use 75 weeks, though this may vary depending on your store’s average order frequency.
- Recent Orders: Exclude contacts who have placed an order in the last X weeks. In this example, it’s 75 weeks.
- Checkout Activity: Exclude contacts who have started a checkout process in the last 75 weeks.
- Website Visits: Exclude contacts who have visited your website, as they aren’t inactive.
- Engagement: Exclude contacts who have clicked on a message in the last X weeks (e.g., 75 weeks).
Create a Sunset Workflow (Automation) in Omnisend
Now that we have defined the segment conditions for our sunset workflow, it’s time to create the workflow. Below is the workflow I created in Omnisend:
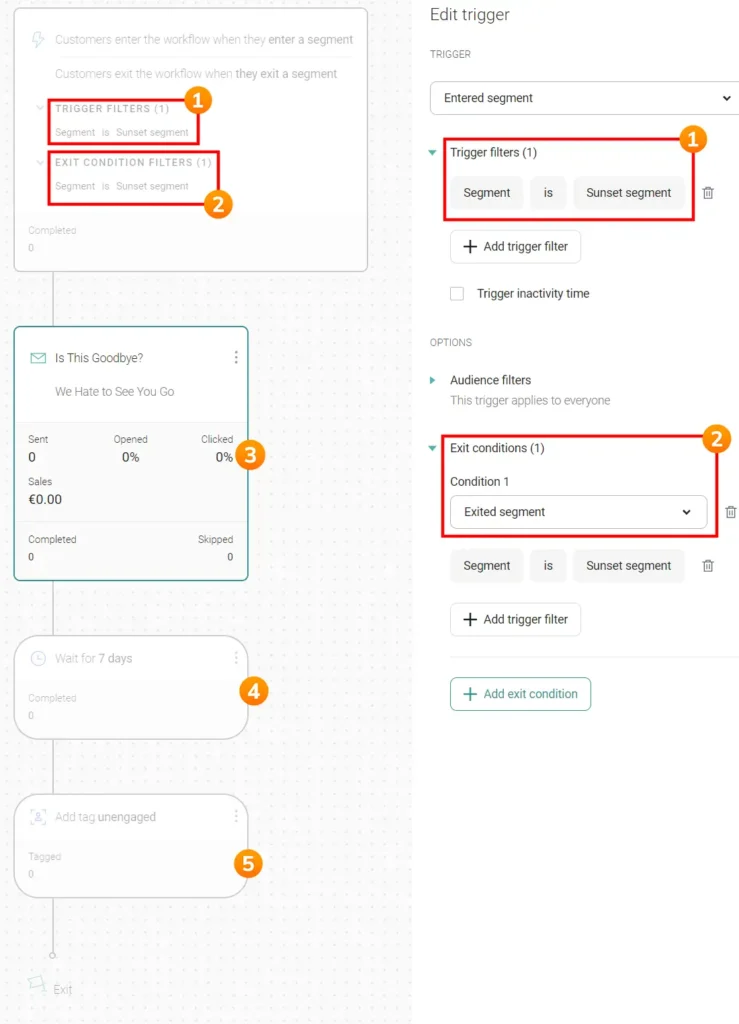
- Trigger: The workflow starts when a contact enters the Sunset segment, meaning they have been inactive for the last 75 weeks or whatever timeframe you chose.
- Exit: A contact will be removed from this workflow when they leave the Sunset segment, automatically exiting the segment if they become active again for any reason.
- Initial Email: When a contact is added to the Sunset segment, the workflow will be triggered for that contact, and the “Is this a goodbye?” email will be sent.
Example email text:
Our email system shows that you aren't interacting with our emails. You're probably busy living your life, and that's totally fine!

We just don't want to send unwanted emails, so we will remove your email address from our newsletter, and you will not receive any more emails from us in the future.

If you think this is a mistake and still want to receive our emails, please click here and you will NOT be removed.
If they click the link in the email (indicating they want to stay on the list), they will be removed from the automation/workflow as they will exit the Sunset segment by clicking the link.
Of course, you can add more emails or be more creative with the emails, but this is an example you could use.
- Waiting Period: The next step in the automation is a waiting period of, let’s say, 7 days. This gives your subscriber time to open the email and potentially click the link.
- Tagging: If the contact doesn’t click the link in the email, the next step is to add a tag (e.g., Unengaged). Omnisend doesn’t allow automatic unsubscription from the email list within the workflow builder, so you need to manually unsubscribe them. The tag helps identify which contacts need to be unsubscribed.
Delete Inactive Contacts in Omnisend
The final step of the Sunset workflow is to delete contacts who didn’t click the link to stay on the list.
Unfortunately, Omnisend doesn’t support automating the unsubscription process, so this step must be done manually. If Omnisend had this feature, we could have added an extra step after the 7-day waiting period to automatically unsubscribe contacts. Since Omnisend lacks this option, a few extra manual steps are required.
See the screenshot below for detailed instructions:
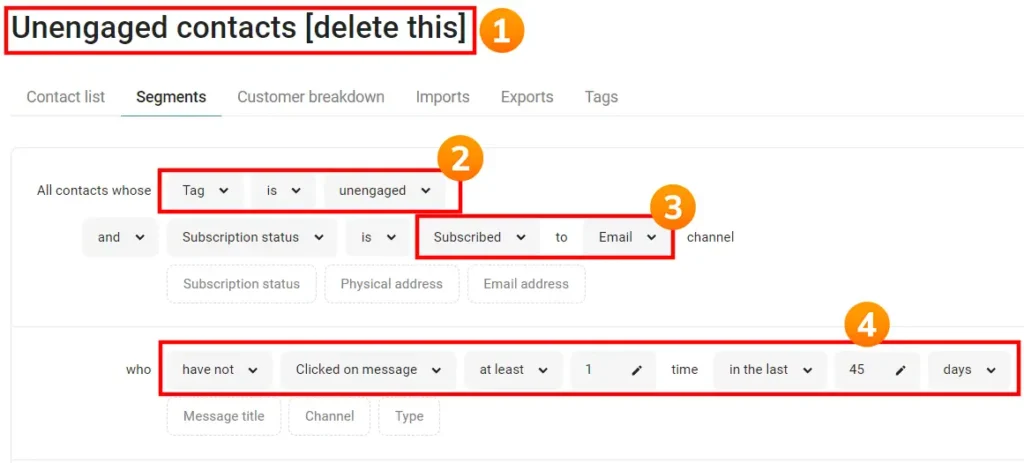
- Create a New Segment: Start by creating a new segment in Omnisend. Give it a clear name, such as “Unengaged contacts [delete this],” so you know its purpose. You will periodically need to visit this segment to delete the contacts within it. The frequency doesn’t matter much, but this manual process must be done regularly.
- Segment Conditions: The first condition should identify contacts with the tag Unengaged.
- Ensure only subscribed contacts are included.
- Although you checked for inactivity in the Sunset workflow, you might add a condition to filter out contacts who haven’t clicked a link in the last X days. This extra check can help ensure accuracy.
Once you have created this segment, you can periodically unsubscribe the contacts in this segment.
Omnisend Review: Popup & Opt-in Form Features
In this section of my Omnisend review, I discuss its popup and sign-up form features. You can read more details below, but the bottom line is that Omnisend provides excellent features for e-commerce stores to set up high-converting popups for email or SMS, with extensive customization options.
My rating: 5 stars (Great)
Pre-designed templates
While I haven’t counted every template, Omnisend offers a very long list of pre-designed templates, giving you plenty of options to choose from.
Popup and Opt-in Form Builder
In addition to pre-designed templates, Omnisend offers a wide range of options to customize your sign-up forms to your liking.
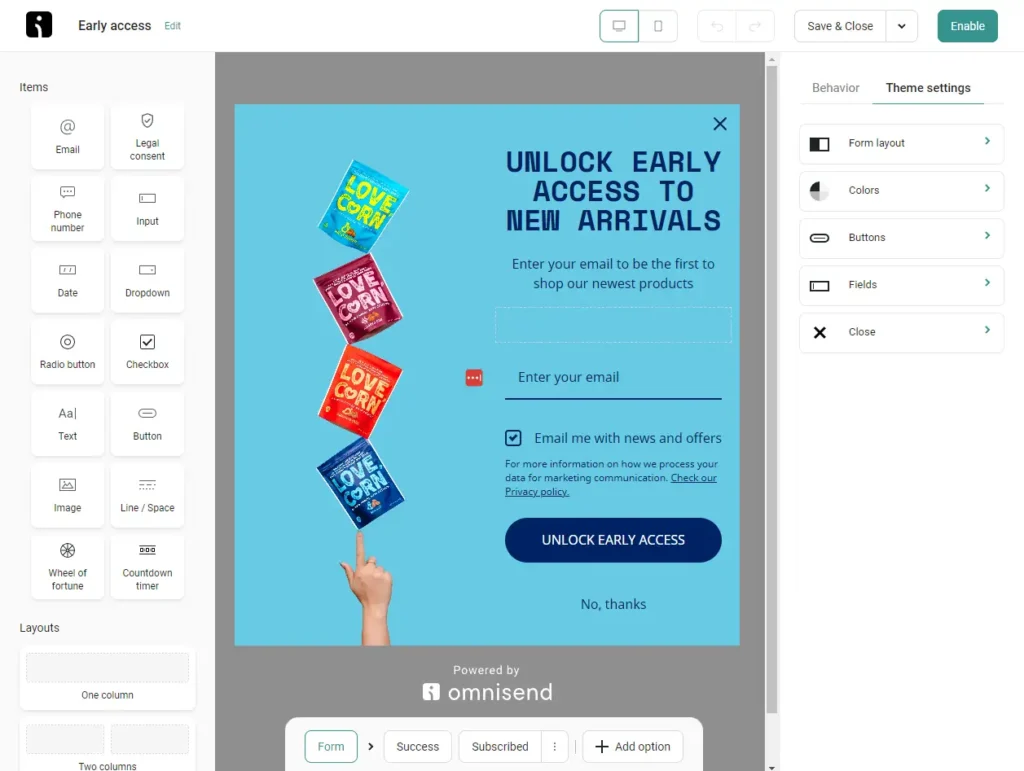
The opt-in forms come with various behavior settings, as shown in the screenshot below.
Here are a few examples:
- Audience Management: Easily enable a double-opt-in email if desired.
- Scheduling: Set a start and end time for your popup, which is useful for special discount events.
- Display: Choose how you want the popup to be triggered, such as by the number of page visits, time on page, scroll depth, or exit intent.
- Visibility: Show a popup only on mobile, for instance, allowing you to create different popups for mobile and desktop. This is highly recommended.
- A/B Testing: Test different elements on your popup to determine what converts best.

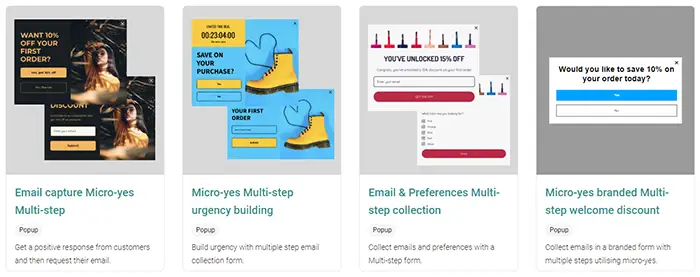
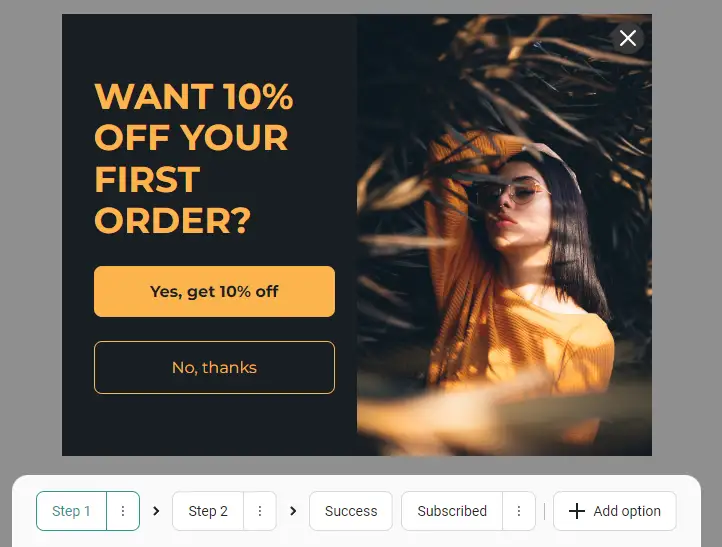
Micro-Yes (Two-Step Process)
Another useful feature is adding a micro-yes step in your popup. The first step, as shown in the screenshot below, asks whether the visitor wants a 10% discount. When they click ‘Yes,’ they proceed to the second step, where they enter their email address to receive the discount. This psychological marketing technique can increase your conversions because once visitors say yes to the first question, they are more likely to say yes to the second, which is the email opt-in.
The screenshot below shows the second step, which requests the email address.

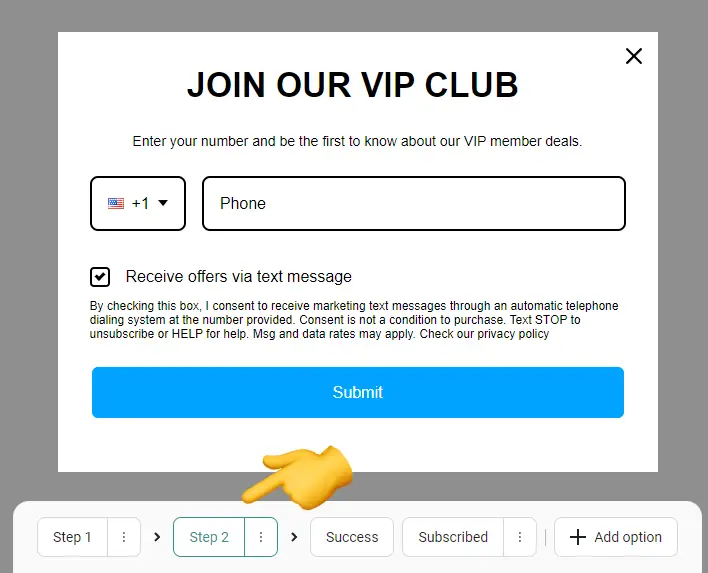
You can also use this multi-step process to first ask for the email address and then for the phone number (see the screenshot below for an example). Having both input fields on one screen can lower the conversion rate of your popup form, so splitting them into two different steps is more effective and recommended.
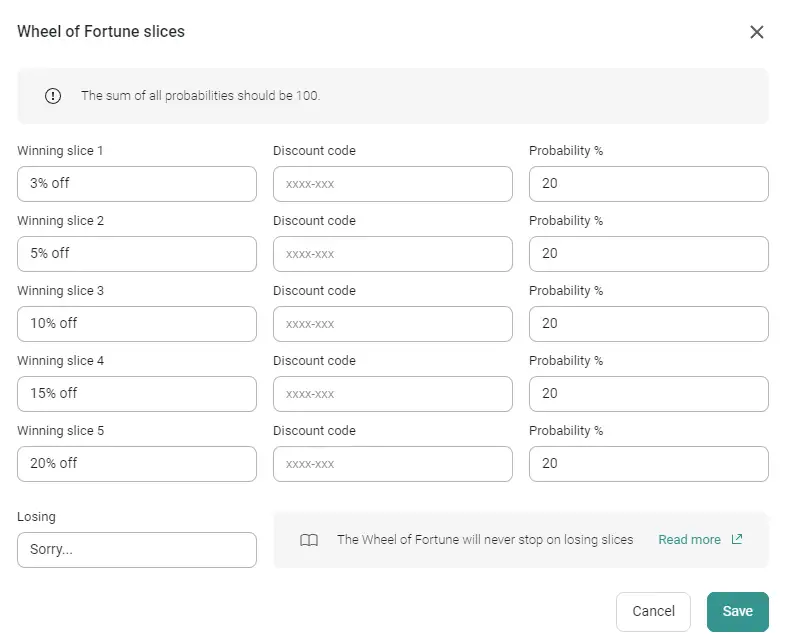
Alternate Features (Countdown Timer & Wheel of Fortune)
While a countdown timer or wheel of fortune feature isn’t essential for creating a high-converting popup, it might be worthwhile to test these extras once you’ve set up the basic email marketing components for your e-commerce store.
The screenshot below shows Omnisend’s wheel of fortune.
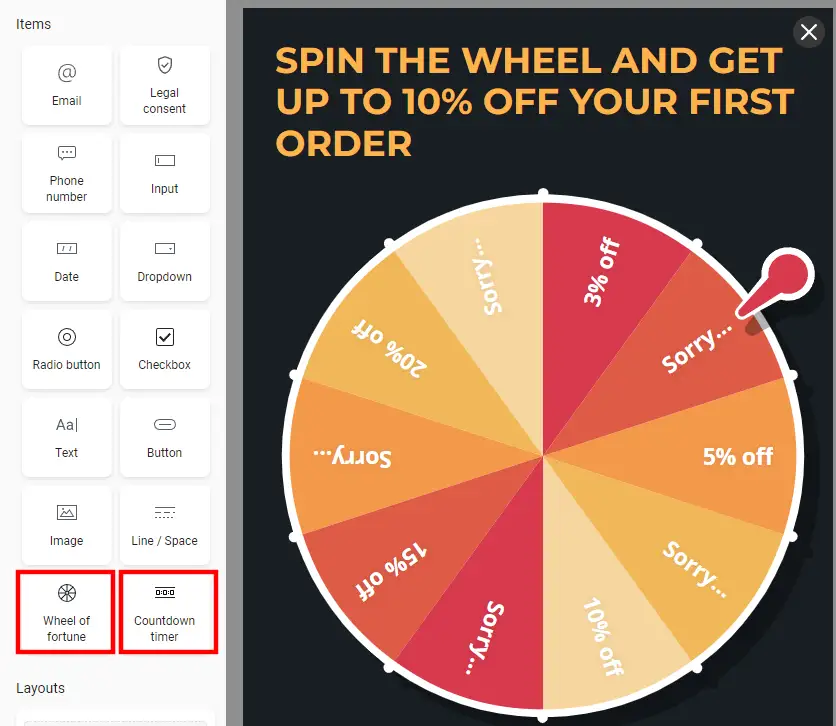
In the screenshot below, you can see how the wheel of fortune is set up. You can adjust the probabilities to suit your needs. Pretty cool!
Omnisend Review: Landing Page Features
In this section, I’m examining Omnisend’s landing page features. The bottom line? It’s essentially the same as the form/pop-up feature, with the main difference being that you can link to the landing page. While some email tools offer a more robust, website-like builder for their landing pages, Omnisend doesn’t. It’s a basic page where you can add a form, but for e-commerce businesses, that’s usually sufficient.
My rating: 3-stars (It’s fine)
Landing Page Strategies
Although discount popups are the most common way for e-commerce companies to gain new subscribers, landing pages can still be useful for other techniques:
- Birthday Discounts: When sending a non-promo newsletter, include a message at the bottom like: “Want a 10% discount as a birthday present on your birthday? Share your birthday with us.” Link this to a landing page where existing contacts can update their details, enabling you to gather more information and send more targeted emails.
- Extra Discounts for Contact Information: Include a link in your newsletter that says: “Click here for an extra 10% discount on your next order.” This directs to a landing page where subscribers can get the discount by sharing their phone number, which you can use for SMS marketing.
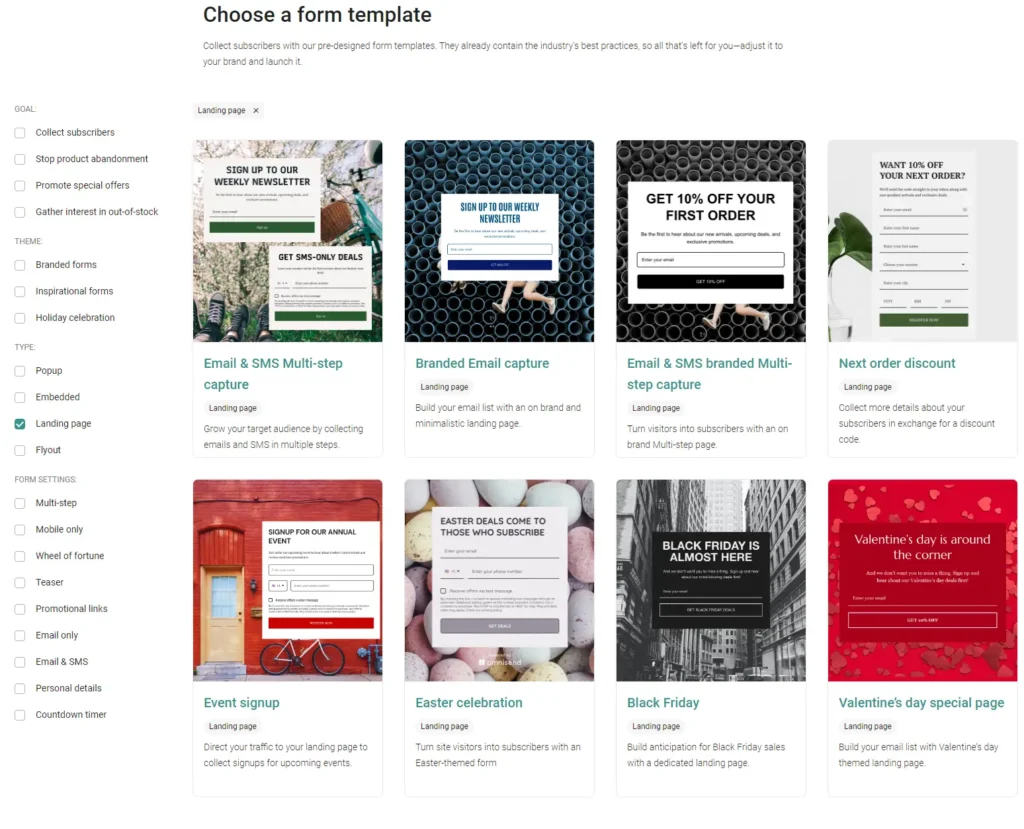
Pre-designed Landing Page Templates
Creating a landing page with Omnisend is similar to creating a popup. You click on forms and then select “landing page” in the filter. Omnisend offers eight pre-designed templates for creating a landing page.
Landing page settings
All the features available for popup forms are also available for landing pages. You can refer back to the popup & opt-in form section of this review to explore all the form features.
Custom domain
When publishing your Omnisend landing page, you have to use its default URL, which doesn’t look very nice:
https://omniform1.com/forms/v1/landingPage/664c51ddb57b0d72cbe17a67/664dcfabfbff0b5b335bfa84The downside of using such a URL is the lack of branding, which doesn’t appear very professional if you are directing traffic to that URL.
A better URL would be something like:
https://creatoregg.com/name-of-your-landing-pageOmnisend Review: Support
Support for Free Plan Users
Omnisend offers 24/7 chat and email support to all its users, including those on the free plan.
Long Waiting Times
Despite the 24/7 chat support claim, you won’t always get an immediate response.
In most cases, I had to wait over 60 minutes for a reply to my chat question. One example reason was: “I apologize for the delay. I was on my break. Thank you so much for your patience and understanding.”
I understand that breaks are necessary, but promoting 24/7 chat support implies immediate assistance, which isn’t always the case. It also seems like there’s only one person answering questions at a time.
During chats, it often takes several minutes to get another reply, which is counterproductive. With chat, I expect a quick response. With email, I’m not constantly checking for a reply. With chat, I anticipate a quick response, so it’s frustrating when it takes up to 60 minutes.
No Expert Support Employees
Waiting for replies is even more frustrating because not all support employees know Omnisend well, resulting in longer delays: 24 to 48 hours.
For example, I asked whether it was possible to add a custom domain to Omnisend’s landing pages.
Instead of using the default landing page URL:
https://omniform1.com/forms/v1/landingPage/6641c3f085eafbd14bcd71b5/664478f0fbff0b5b335bf09c
I wanted to change it to something like:
Creatoregg.com/landing-page-1
I had to explain my question twice before the support employee understood. If you’re familiar with email marketing and landing pages, this should be an easy question to answer.
The chat support answer was that she needed to check with their tech team. Eventually, I found out it wasn’t possible, and they would put in a feature request.
Not Focused on Solving the Issue Quickly
I asked the following question at 7:15 am:
“Can I also trigger the browse abandonment workflow as someone just visited my website? I don’t want to specify a specific page.”
Ten minutes later, I received this answer:
“Hello Robbin, sure, so you would like it to be for all the pages of your website?”
It’s pretty obvious I want it to be for ALL pages. Now the support employee asks me another question instead of solving my issue. I saw her reply 1.5 hours later and responded:
“Correct. How do I do that?”
I didn’t get a reply for another 45 minutes. Instead of answering the question and solving my issue, she asked for the URL of my automation.
“Sure, would you please share with me the URL link of your automation on your Omnisend account?”
The employee goes back and forth when the answer is simple. Does Omnisend allow me to trigger automation when someone visits my website, or can it only be triggered with a specific page? This question could have been answered quickly, but it took ages.
Overall, I’m not the biggest fan of Omnisend’s chat support. Take their “top-notch 24/7 support” claim with a grain of salt.
My rating: 2-stars (Meh)
Omnisend Review: Reporting Features
In this section of my Omnisend review, I’ll take an in-depth look at several reporting dashboards of Omnisend. The bottom line? It has some limitations but offers solid features with its Pro tier.
Keep Track of Subscriber Growth
When reporting to yourself, your manager, or your client, you want to share monthly reports and compare them to determine whether your list is growing.
When you visit Omnisend’s dashboard, you’ll see a report similar to the one in the screenshot below. While this dashboard shows the number of new subscribers, it is limited in the timeframe you can choose. For example, if you want to see the report from two months ago, you can’t, as it only goes back one month. Additionally, you can’t compare months directly, meaning you’ll have to do this separately in a different datasheet. Bottom line? Not the best.
Newsletter Reporting
In short: Omnisend’s reporting features are great, but you must be on the Pro tier to access its advanced reporting features.
Longer version: Every email tool offers individual campaign reporting features, showing you the performance of individual newsletters. While it’s essential to know how your campaigns are performing, it’s equally (if not more) important to have a clear overview of all your campaigns over any given period.
To access the “clear overview” reports in Omnisend, you need to subscribe to its Pro tier, which grants access to ‘Advanced Reporting’. Without advanced reporting, the basic reporting isn’t the best.
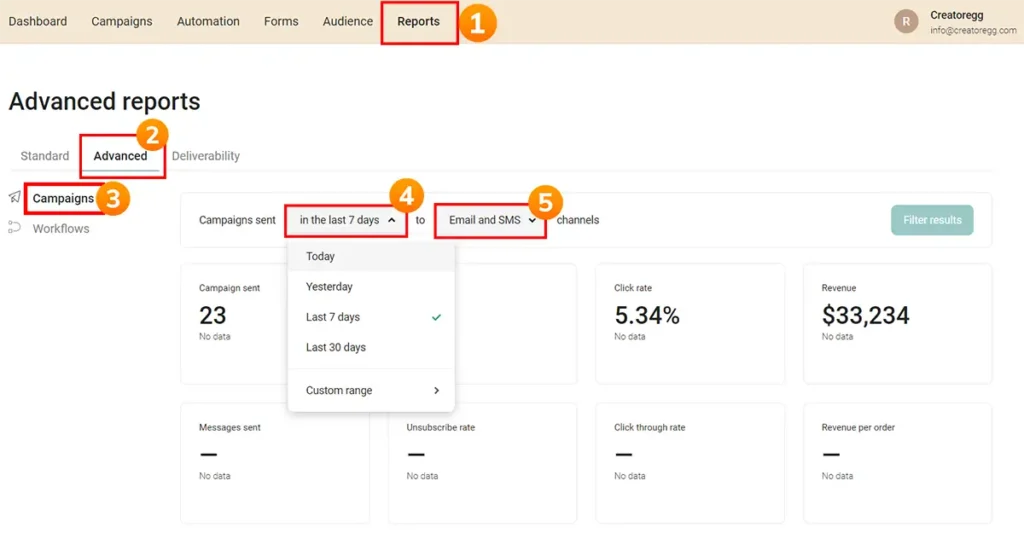
In the screenshot above, you can see an example of Omnisend’s advanced reporting capabilities:
- To visit the reporting dashboard, click on Reports.
- If you are on the Pro tier, you can access its advanced reporting features.
- I appreciate that it distinguishes between campaigns and workflows, allowing you to clearly see the results of both instead of having a combined view.
- The advanced reporting dashboard allows you to filter by a custom date range, which is crucial for effective reporting.
- You can also filter by email and SMS or view both.
Overall, the reporting features are quite good. However, a comparison feature to compare custom date ranges would make it even better.
My rating: 4-stars (Good)
Automation Reports
In short: Omnisend’s automation reports are excellent, but you must be on the Pro tier to access the advanced reporting features.
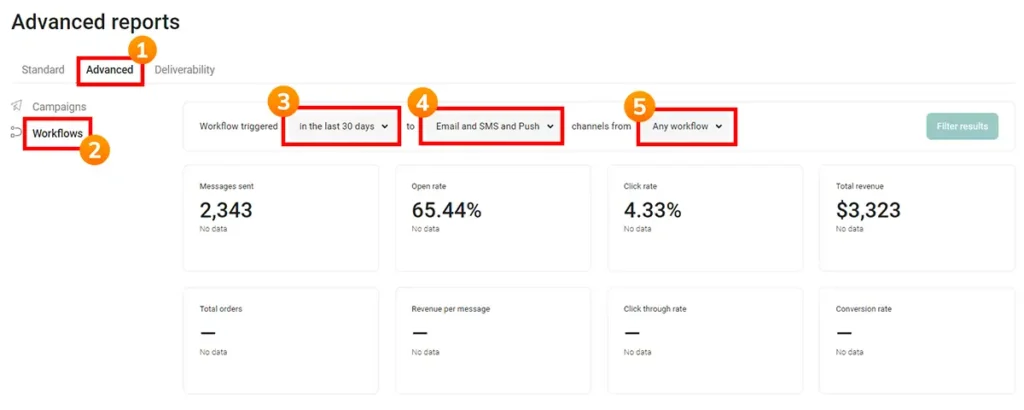
Longer version: The screenshot above shows an example of Omnisend’s advanced reporting capabilities for automation reports:
- To access advanced reporting, you need to subscribe to the Pro tier.
- Omnisend distinguishes between regular newsletters (campaigns) and automations (workflows).
- It allows you to select a custom date range, which is a key feature of any advanced reporting system.
- You can create a filter to select all channels (email, SMS, and push messages) or just one channel.
- It also allows you to select all workflows or specific workflows, which is very useful. For example, you could filter for abandonment campaigns to see how they are performing.
Overall, the reporting features are quite good. However, a comparison feature for custom date ranges would make them even better.
My rating: 4-stars (Good)
Sign-up Form and Landing Page Reports

In the screenshot above, you can see an example of Omnisend’s sign-up form reporting.
- Unfortunately, there isn’t a tab for forms and landing pages in the advanced reporting feature. Instead, you have to navigate to the Forms tab to see your form reports, which is far less impressive than the advanced reporting features for newsletters and automated messages.
- The date range filter only offers three options: last 7 days, last 30 days, and show all-time data. This means you can’t select a custom time period or compare different periods.
- The data provided includes the number of views your form received, the number of submissions, and the conversion rate. However, without a good time period selection feature, it’s not very useful for comparing different periods. Additionally, there’s no option to see aggregated data; you can only see individual form results, but I want to see all data at a glance.
Bottom line? I’m not a big fan of the sign-up form and landing page reporting features.
My rating: 2-stars (Meh)
Frequently asked questions
Is Omnisend legit?
I’ve extensively tested Omnisend and can confirm that it’s a legitimate product. Founded in 2014, Omnisend generated $19.1M in revenue in 2020 from 7,200 active customers.
Who is Omnisend best for?
Omnisend is ideal for e-commerce companies looking to implement email and/or SMS marketing.
Omnisend’s History
Omnisend is a privately held company without any outside investors, founded in 2014.
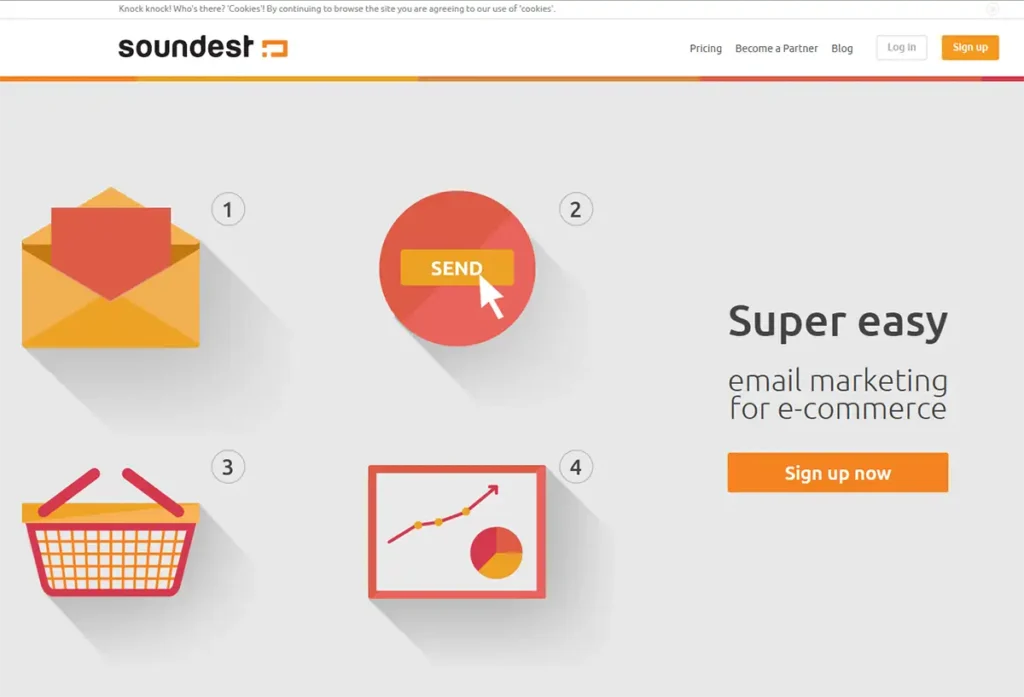
According to co-founder Rytis Lauris’s LinkedIn profile, he had a digital marketing agency called Soundest, founded in 2009. He quit that agency in 2013, and as shown in the screenshot below, they became 100% focused on their new product: email marketing for e-commerce.
It’s interesting to see how the essence of the product hasn’t changed. They started with email marketing for e-commerce, and that’s still their mission. Now, they also focus on SMS marketing in addition to email.
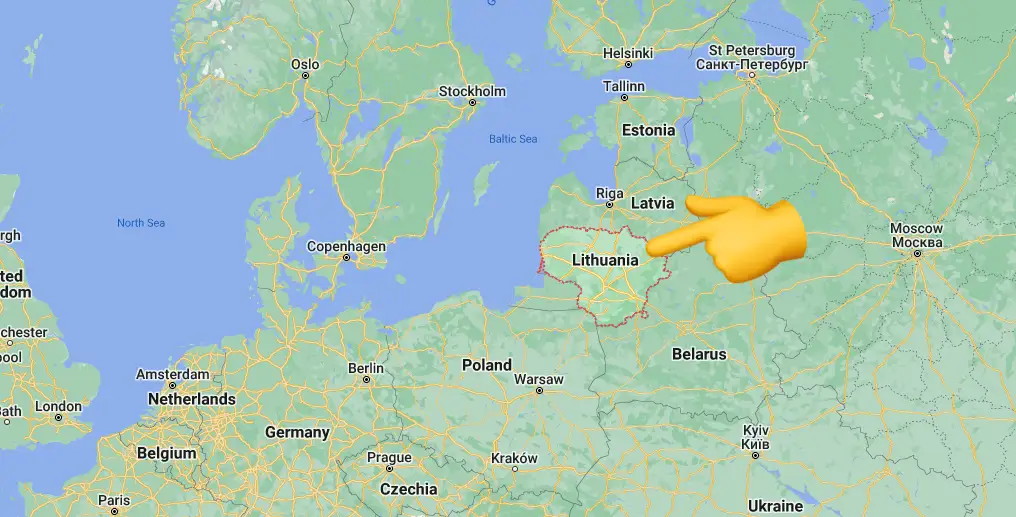
Currently, Omnisend’s headquarters are in London, and the company was founded in Lithuania, Europe.
One of Omnisend’s biggest competitors is Klaviyo, which is also 100% focused on e-commerce companies and launched a few years before Omnisend, in 2012.
In the video below, you can listen to an interview with the founder of Omnisend published in 2019.
If you’re finding this content valuable, share it with a friend, and consider subscribing if you haven’t already for updates on great content.
Sincerely,
Robbin 👋