Last updated May 19, 2022
This new guide shows you the exact steps of how to create your author website within no-time.
I self-published 4 books, and last year, in 2020, I made $259,463 from selling my 4 self-published books.
Want to know the best part?
82% ($223,320) of the total revenue came from my own website!
Ready to launch your author website? Let’s go!
I self-published 4 books, and last year, in 2020, I made $259,463 from selling my 4 self-published books.
Want to know the best part?
82% ($223,320) of the total revenue came from my own website!
Ready to launch your author website? Let’s go!
How to start a successful author website in 5 steps:
Step #1 Choose your website name and your website web hosting
Choose your website name
By website name, I mean domain name. For example, for this website, the domain name is creatoregg.com.
A brandable name or your own name?
If your name is John Doe, then a personal domain name would be www.johndoe.com.
A brandable domain name can be something that doesn’t have a particular meaning. Take Twitter, for instance, or Facebook, or Google. Those are perfect examples of brandable domain names.
The name for this blog is a brandable name too-Creatoregg.com.
For us authors, you can’t do anything wrong here. It makes perfect sense to use your name as your domain, but it’s possible to use a brandable name as well.
What’s the bottom line?
- Keep your domain name short of around a maximum of 10. Short domain name names are easier to remember, they take less space, and it looks cleaner. If your personal name is longer than 10 characters, like mine (18), preferably go for a brandable domain.
- Make sure you buy the .com extension since that’s the most popular. If it isn’t available, please don’t spend your valuable dollars purchasing it. Just buy another one.
- When choosing a brandable name, make sure to think broader than just the goal of writing your first book. For instance, at first, my idea was to name this website authoregg.com. By doing so, I hinder myself from pursuing other topics than book writing and book marketing. By choosing the domain name Creatoregg.com I offer myself enough room to expand to different niches, such as sharing tips on YouTubing, blogging, ecommerce, etcetera.
- Don’t use dashes in your domain name since it’s not easy to remember nor spell.
- Don’t spend too much time thinking about a domain name. For instance, I spent around 1 hour finding the name Creatoregg.com. It’s probably not the best name but also not the worst. Just remember, your future domain name will not be critical to your success as an author. How you will do your marketing will!
You receive a free domain when purchasing your web hosting through Bluehost.com. That’s where I bought my domain names and host my websites.
Set up your author website web hosting
For my websites, I use Bluehost.com. It’s the cheapest web hosting I could find, and most bloggers recommend it.
I only pay $3 per month for my website domain name + web hosting with Bluehost.
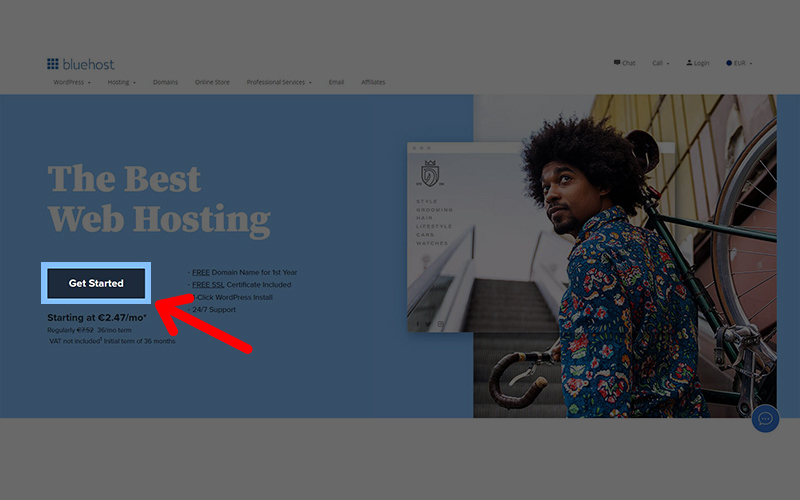
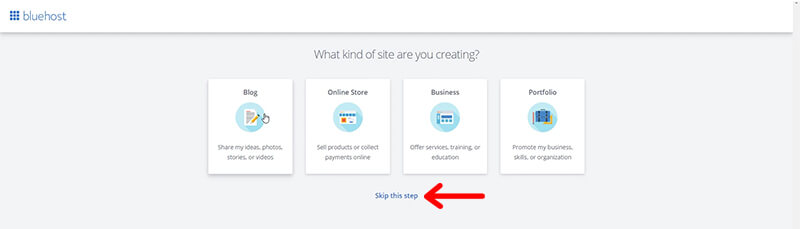
Once you’re on the Bluehost homepage, you click the get started button.
You then see you can choose for either 12 months, 24 months, and 36 months.
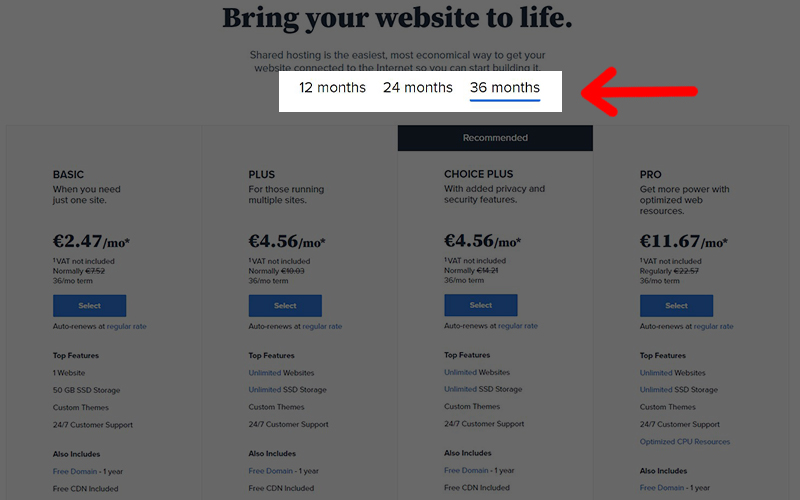
For me, it’s a no-brainer to choose 36 months since I’m starting my author website for the long haul and not for only 1 or 2 years.
A good thing to mention is that you need to pay that dollar-amount upfront.
The next thing is that you need to choose the web hosting plan.
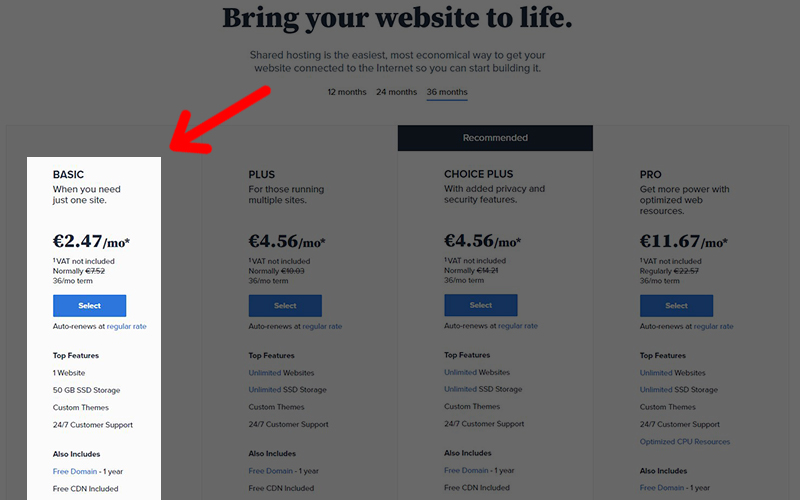
You have 4 options; the basic plan, plus, choice plus, and the pro plan.
For this website, I chose the basic plan, the cheapest one.
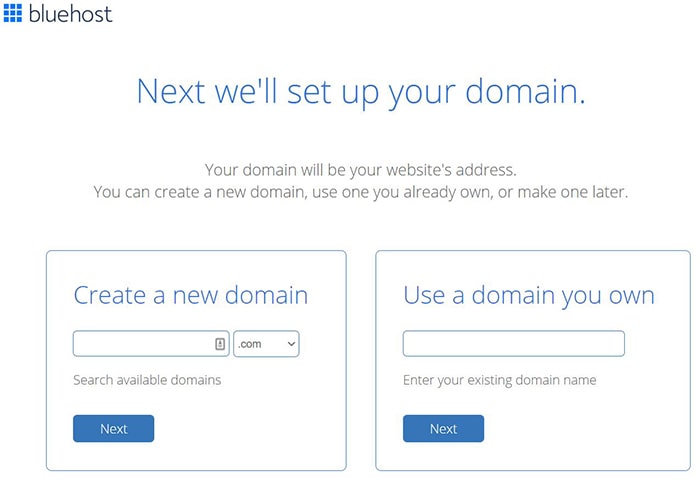
Once you selected the plan you like, you move on to creating your new domain.
If you already own your domain, you can enter it in the right column, and if it’s a new domain, you enter it in the left column.
The next step is to fill in your contact details.
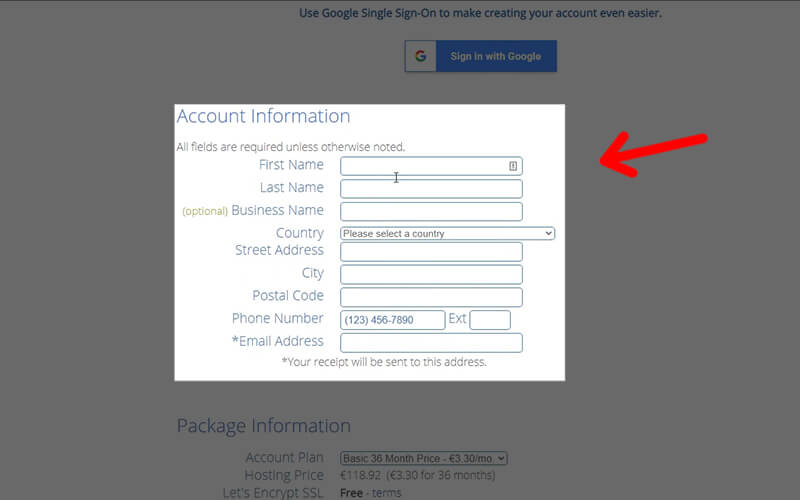
Double-check you’re on the plan you selected before.
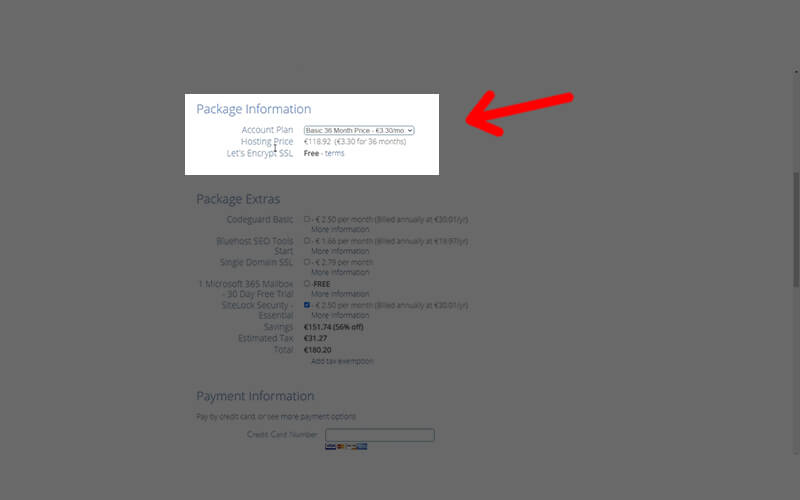
Uncheck all the package extras.
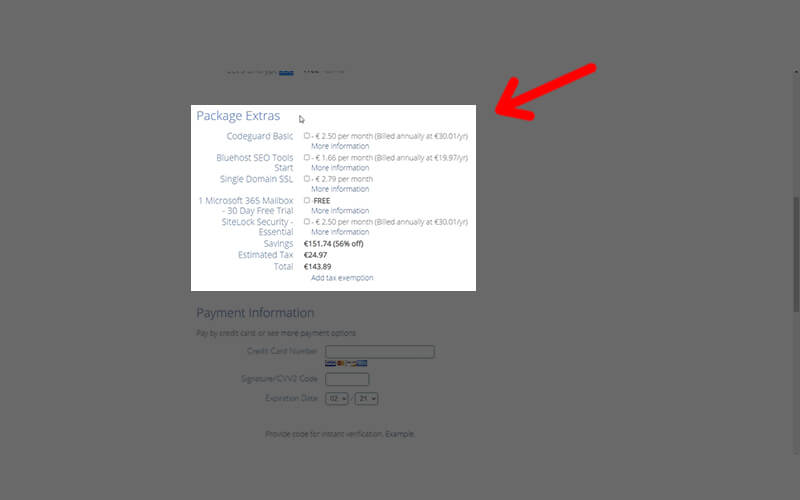
fill in your credit card information, and lastly, create your account.
You did it! You’re now the proud owner of a brand new website!
Step 2 – Install WordPress on your website
The next step is to install WordPress on your website.
Why WordPress? Well:
- WordPress is a so-called content management system (CMS), and the latest statistics reveal that 59% of CMS websites in the world are using WordPress. Their closest competitor, Joomla, only has 6.7%. In other words, WordPress is here to stay, and that’s what you’re looking for when investing your precious time, money, and energy in a website.
- WordPress is free to use.
- It’s Google friendly-meaning, your website will be ready to rank in Google.
- There are 6,000+ free and paid design templates you can choose from, whereas the WordPress theme’s median price is $45. Most often, that’s a one-time fee. In other words, there are unlimited design possibilities.
- There are 50,000+ plugins (same as apps in the app store) created for WordPress by third-party companies for extra functionalities such as contact forms, customer review systems, shopping carts, etcetera.
First, you log in to your Bluehost account with the email address you sign up with and the password you created.
The first time you log in to your Bluehost account you get asked some questions like ‘how much help do you want?’, and some other questions. You can skip all these steps.
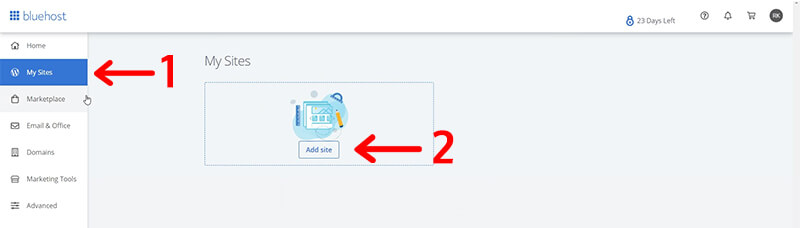
Once you skipped all the steps, you find yourself in the Bluehost dashboard. You then click the ‘My sites’ tap to create a WordPress website.
When you click on the tap ‘My sites’, the next thing you do is click on ‘Add site.’
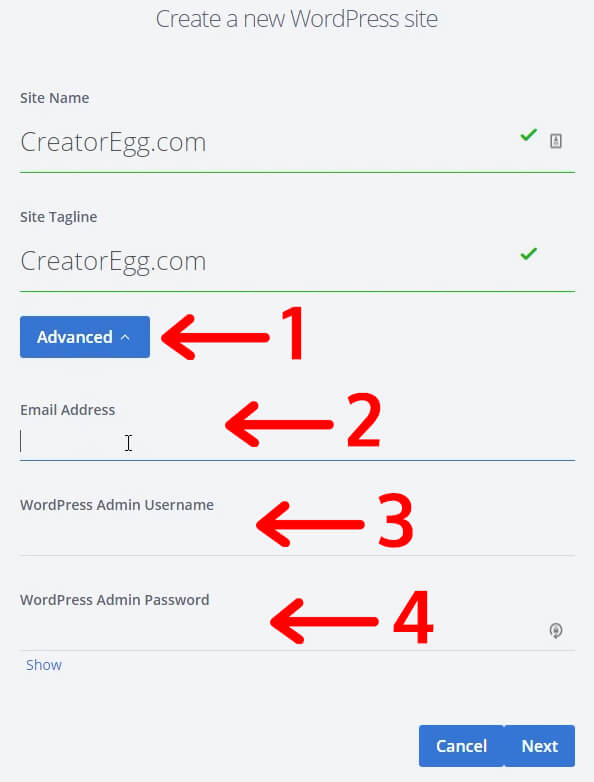
You need to fill in your Site Name and Site Tagline. For the time being, fill in your domain. You can change this later if you want.
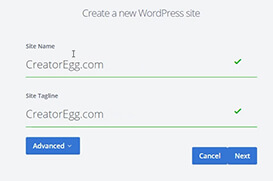
The next step is to click on the advanced button to fill in the email address for logging in to your WordPress dashboard.
I suggest you also fill in your WordPress admin username and the admin password. Make sure to save this information somewhere in a folder on your device, so you don’t lose it. I use LastPass for my login information. You can use LastPass for free.
Click on next.
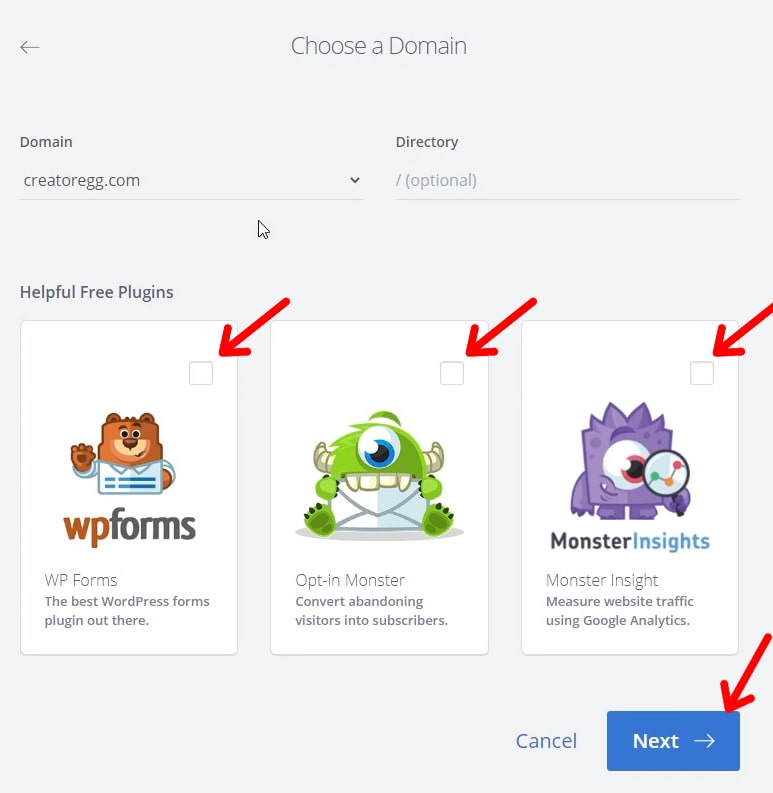
Deselect all the ‘helpful’ free plugins and click on next.
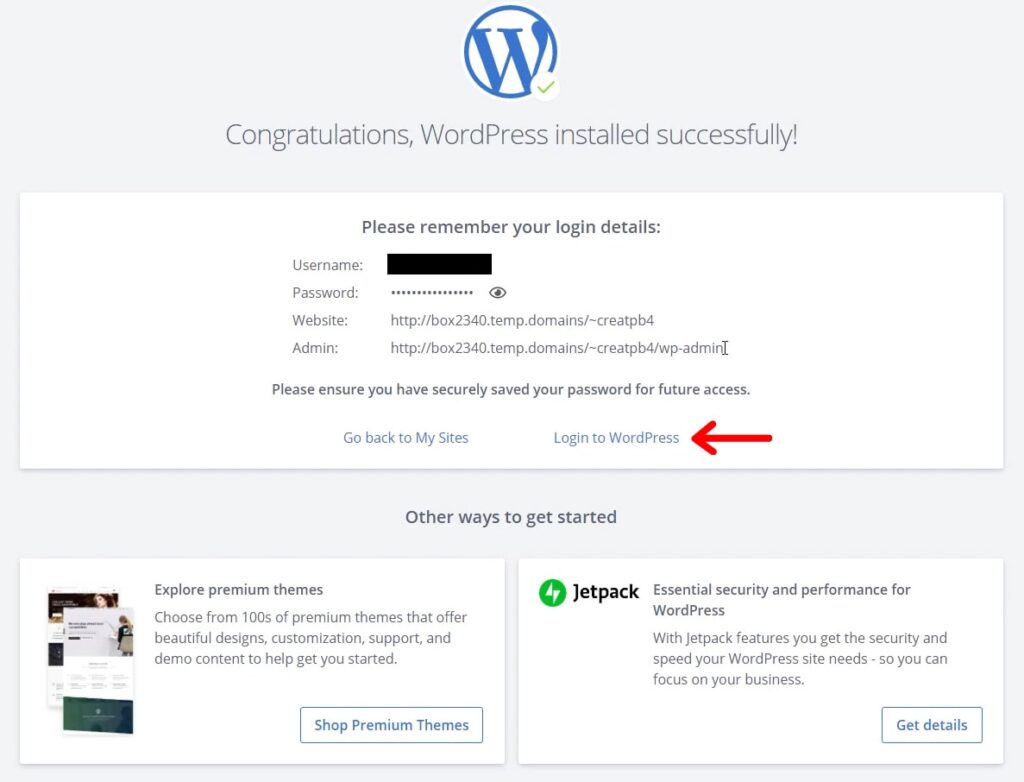
If everything worked out, the next page you see should be that you installed WordPress successfully.
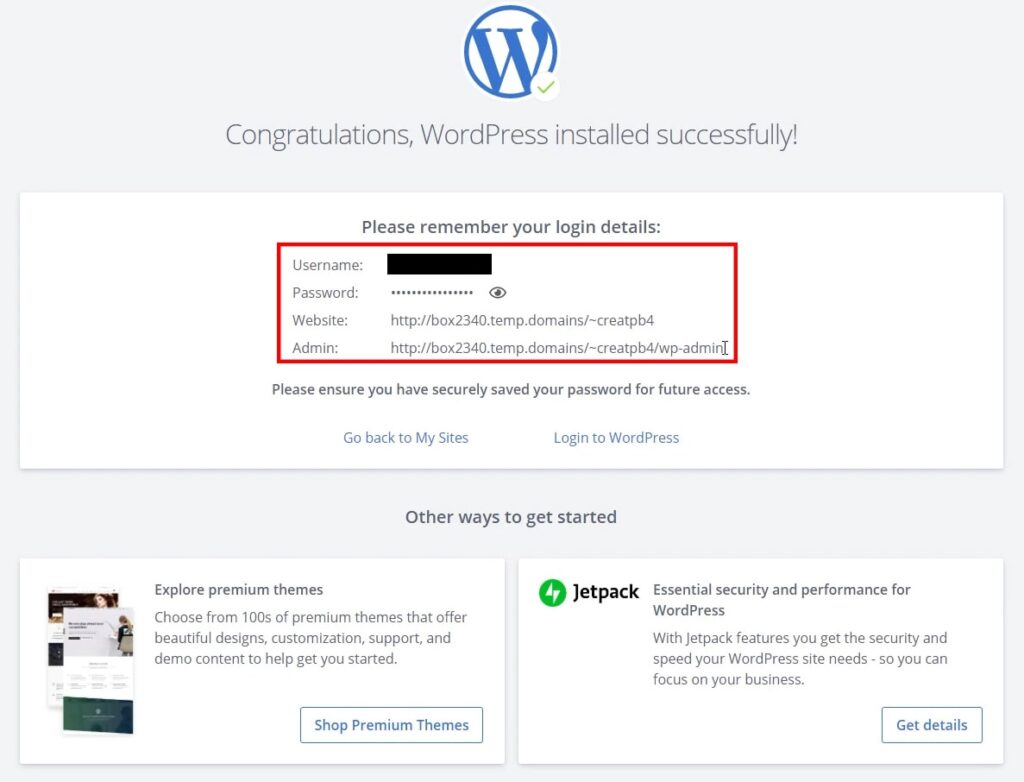
The next thing I click on is ‘log in to WordPress.’
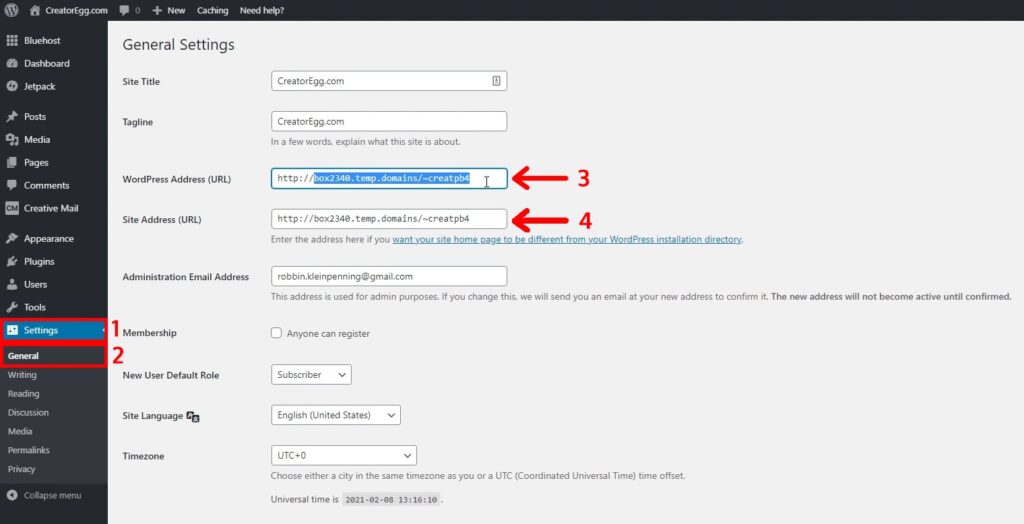
The next thing you want is to use the URL or domain name you choose instead of the strange Bluehost URL.
To do that, you go to ‘Settings’ and click on ‘General.’ In that tab, you’re going to change the WordPress Address (URL) and Site Address (URL) to your domain name.
For me, at first, it looked like this:
I changed it to this:
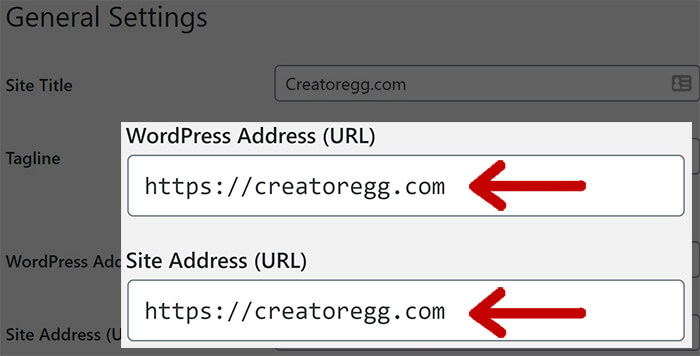
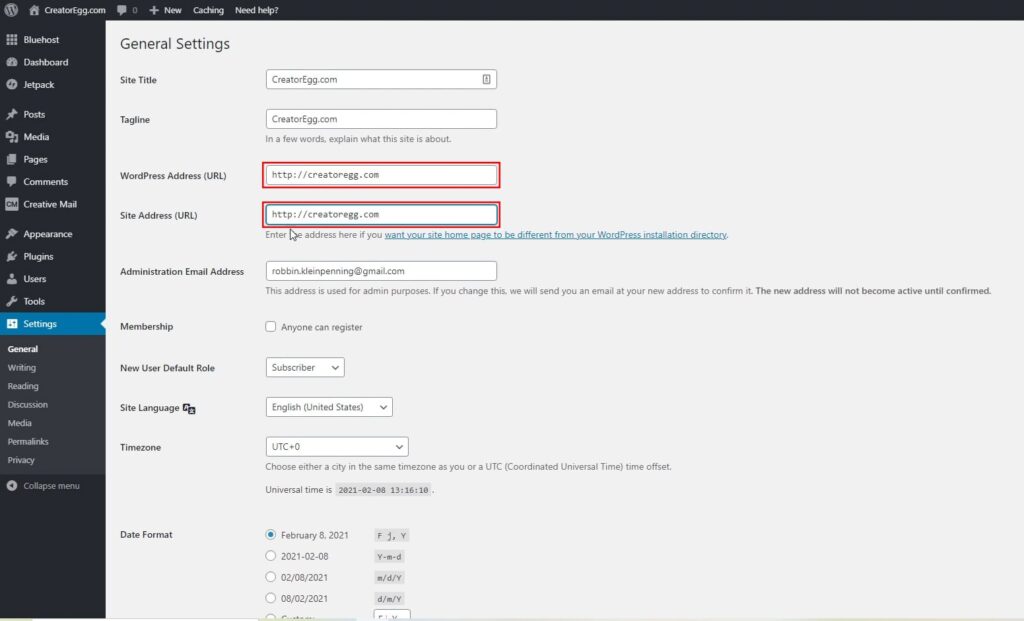
You then click on ‘Save Changes.’
2 good WordPress practices to follow
#1 – Change homepage to static page
The first good practice is to change your ‘Reading Settings’ of your website-meaning; you don’t want to display your latest blog posts on your homepage.
Why not, you wonder?
Well, take a look at all the big brands’ websites you know.
Websites of car brands, coffee brands, you name it.
They all display a nice little introduction on their homepage.
These websites show their products, introduce you to the company, and so on.
They don’t show you their latest news item probably, since that’s not relevant to an entirely new visitor.
The same goes for your author website.
You first want to introduce them to you, your brand, what you do, and what your goal is.
So, to change your homepage to display a so-called static page instead of your latest blog posts, you go to ‘Settings.’
Then you click on ‘Reading.’
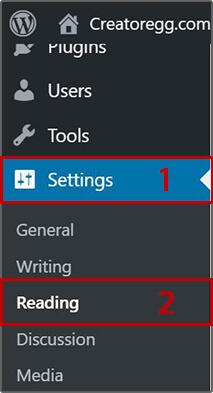
There, you select ‘A static homepage.’
You can change the content of that page later.

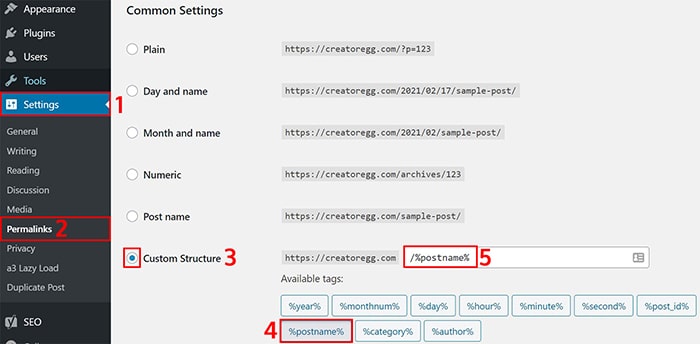
#2 – Create a Google and user-friendly URL structure
You don’t want your page or post to look like this: creatoregg.com/?p=123.
Instead, you want your post to look like this: creatoregg.com/create-author-website.
You want the so-called keyword you’re trying to rank for in Google to be in your URL.
How do you do this, you wonder?
You go to ‘Settings.’
You then click on ‘Permalinks’ and change it from ‘Plain’ to ‘Custom structure.’
In the field of ‘Custom Structure,’ it should say ‘/%postname%.’
What you want to do is to delete that last slash.
Like this: /%postname%.
And not this: /%postname%/.
Step 3 – Add these 3 essential WordPress plugins

As explained before, there are 50,000+ WordPress plugins available.
You can compare a WordPress plugin with an app on your smartphone.
Other companies create these plugins in WordPress for extra functionalities.
Often, you find that companies offer a free version for their plugin—the same thing with apps on your phone.
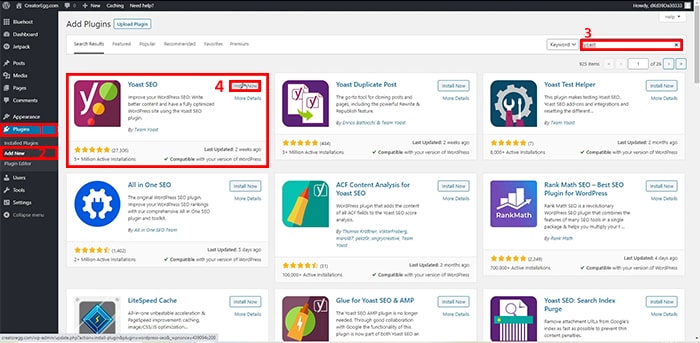
Install Yoast SEO plugin
To install a new plugin for your WordPress website, you go to Plugins.
Then, click on Add New.
At the top right corner, type in the search bar Yoast SEO.
Then you click Install Now.
After that, you click Activate.
Setting changes Yoast SEO plugin
I suggest you make the following changes to the settings of the Yoast SEO plugin:
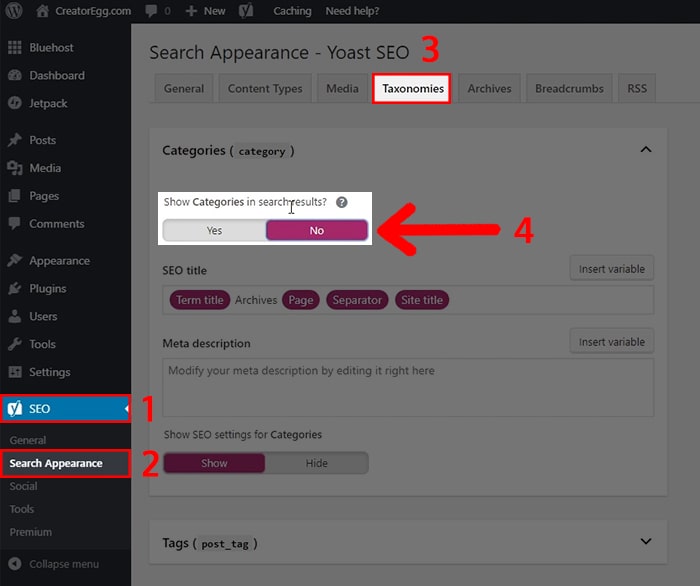
Go to SEO and click on Search Appearance. Then click on Taxonomies.
In my opinion, you shouldn’t use the categories in WordPress. I don’t use them for my websites, either.
Since you don’t want clutter in your website and push low-quality pages to Google, you want to tell Google not to index your category pages.
When you’re in the Taxonomies tab, you switch Show categories in search results to No.
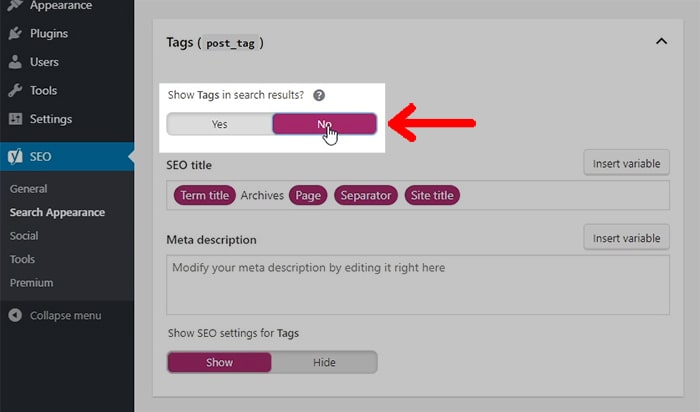
Then move on to Tags.
You don’t want to show Tags in search results, either. Also, tag pages are low-quality pages with barely any use.
Switch Show Tags in search results to No too.
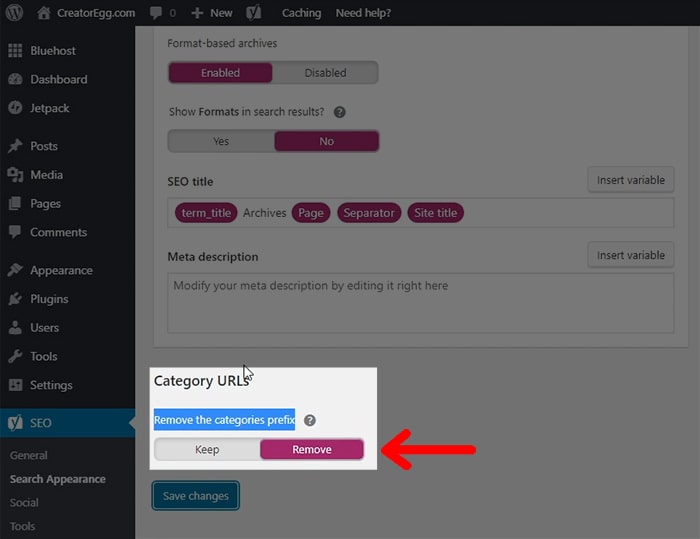
Lastly, you want to remove the category prefix from your URLs. You do this by switching to Remove at Remove the category prefix.
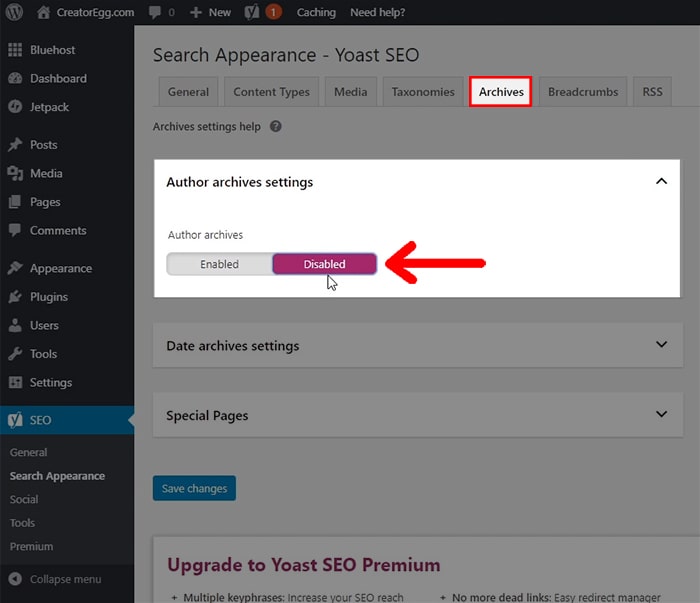
Then you move on to Archives, and you want to switch to disable Author archives. Same story, also low-quality pages that have no use.
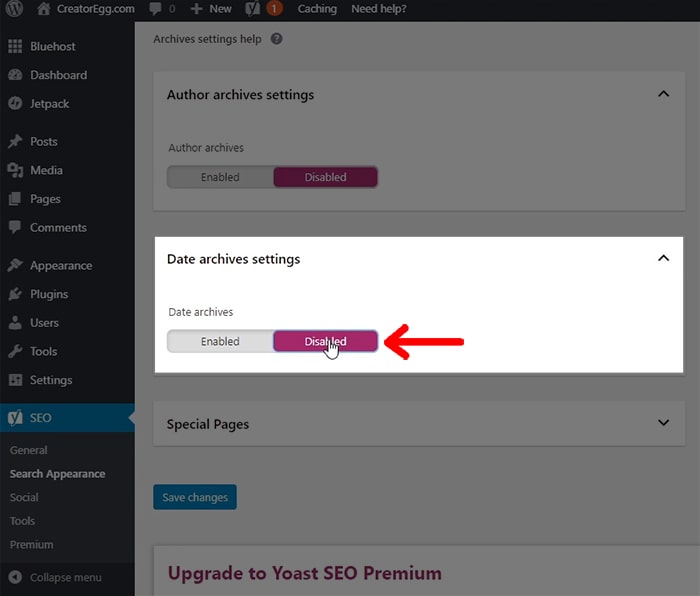
I suggest you also disable Date archives.
Then click on Save Changes.
All-in-all, you want your Sitemap to be as clean as possible-meaning, you only want to show posts and pages in it.
It should look like this:
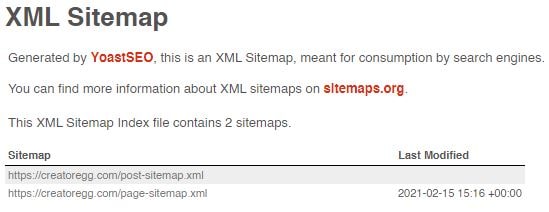
If you want to check out your website’s sitemap go to creatoregg.com/sitemap_index.xml. Use your domain name instead of mine, of course.
What is a Sitemap, you wonder?
A Sitemap is a directory of your website Google uses to index the pages and posts on your website.
You only want Google to index website pages and posts that you feel are highly valuable for the end-user and nothing else.
Remember the phrase A Chain is As Strong As Its Weakest Link Mean?
The same goes for your website.
You only want high-quality pages, and that’s why I de-index every other weak page that has no real value for the end-user.
WordPress Plugin Disable Search
Disable Search is the second plugin I suggest you add to your website.
Go to Plugins and click on Add New.
At the top right corner, type in the search bar Disable Search.
This plugin disables the capability for people to perform searches on your website.
Why do you want to disable search, you wonder?
Well, our core business is selling our books.
Since you probably don’t have thousands of books, people don’t need that search option.
Furthermore, and even more important, when you’re building your website and grow your audience, you probably want to start collecting email addresses at some point.
Also called, email marketing.
One of the ways I collect email addresses is to giveaway free chapters of my book.
People can download these free chapters by entering their name and email address.
I have pages on my website where I share these free downloads.
I also have pages on my website where I share my ebooks for people to download.
These pages are only for the person who either bought my ebook(s) or downloaded my free chapter by entering their email address.
I don’t want random people finding these pages when using the search bar on my website.
If you don’t disable search, people can find these pages.
WordPress Plugin WooCommerce
The third plugin you want to install is called WooCommerce. It’s a free plugin that you need to transform your website into an ecommerce website.
With the plugin WooCommerce, you can sell products on your website.
To install the WooCommerce plugin you follow the same steps as before.
You go to Plugins. Then, click on Add New.
At the top right corner, type in the search bar WooCommerce.
Then you click Install Now.
After that, you click Activate.
Step 4 – Install a template to your author website.

A template gives you new features and/or various design opportunities for your website. As stated before, there are 6,000+ free and paid design templates, so enough choice for everyone.
Click on Appearance > Themes > Add New Theme.
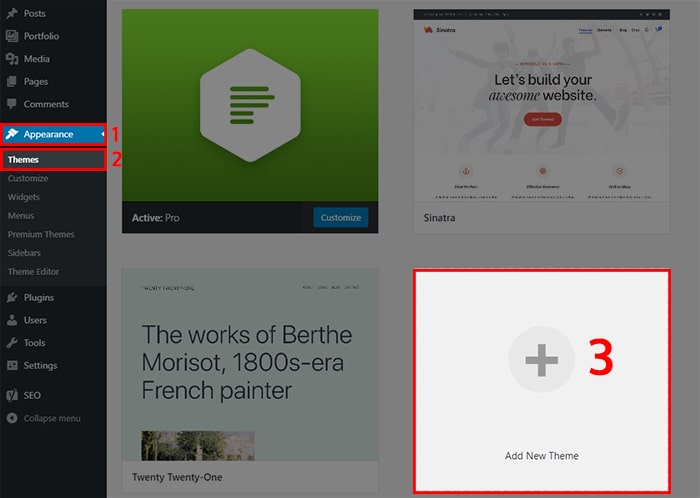
By doing so, you’ll see that you have the standard Twenty Twenty-One theme installed.
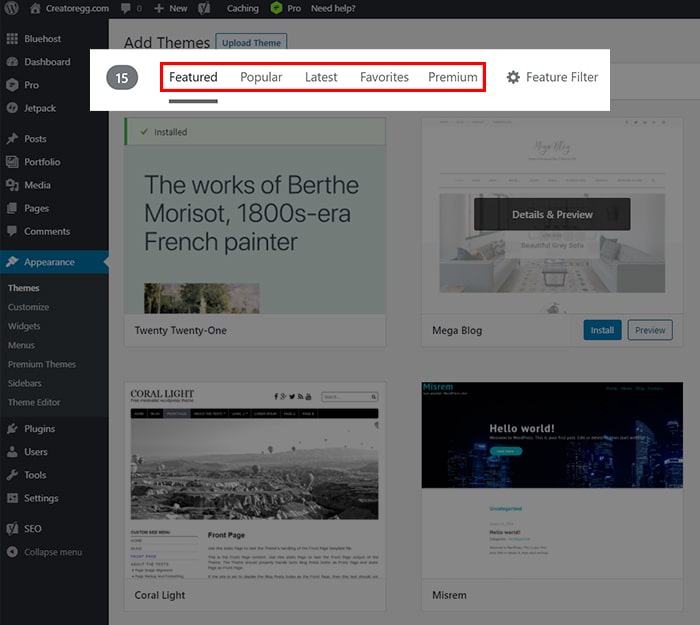
You can click on the theme to preview the template. You can also preview other templates.
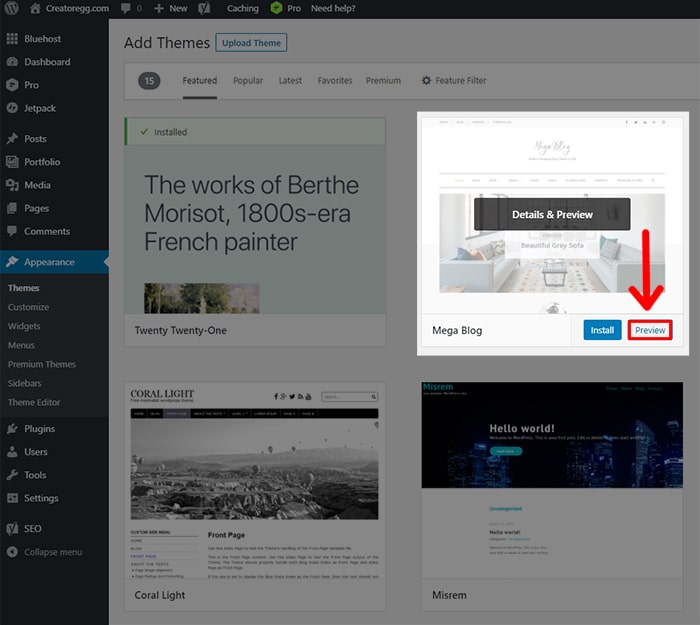
You’re now at the Featured templates tab, but you can also click on Popular, Latest, and Premium to see other templates.
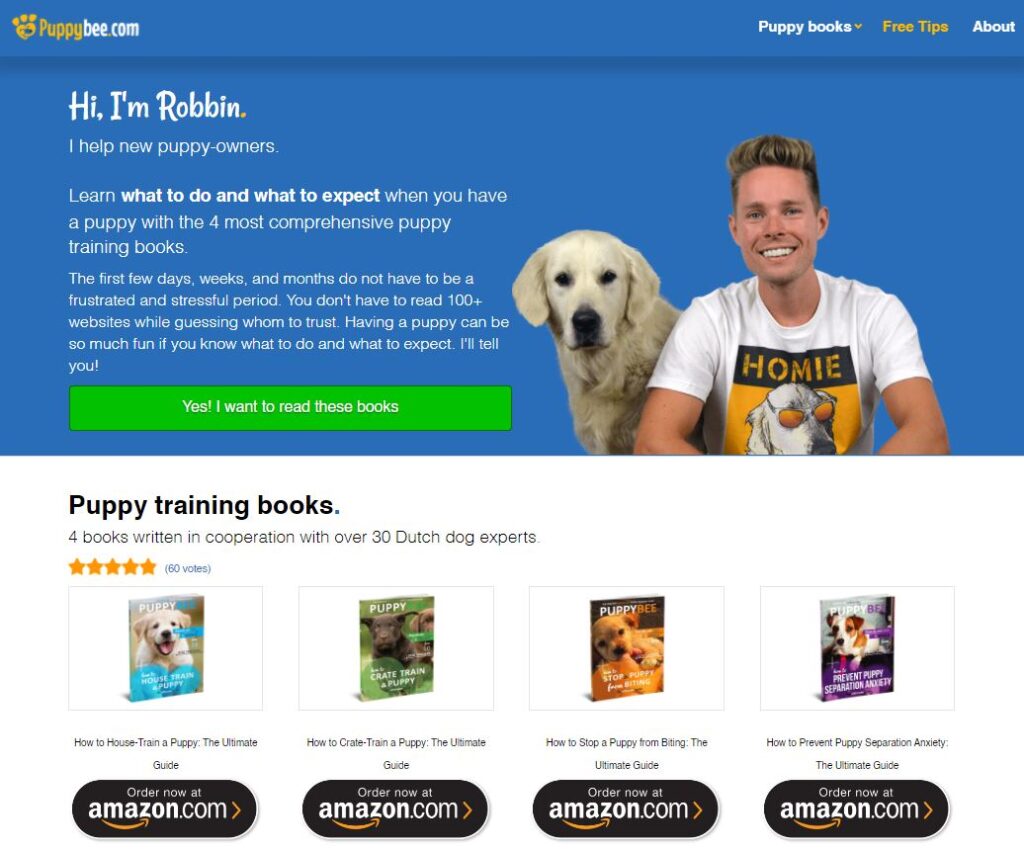
For this website, Creatoregg.com, and my author websites for my 4 self-published books, www.puppygroep.nl and www.puppybee.com, I use the premium WordPress template PROTHEME from Themeco.
It’s a premium theme with unlimited customization features.
The price of this template is $99 for a one-time payment.
They also have a monthly payment option, and that’s $14 per month.
My choice would be the one-time payment of $99 since I plan to use this template for years to come.
In my new online course Website/Blog Creation for Creators, I reveal step-by-step from A-to-Z how you can create the same website as me with the PROTHEME from Themeco.
I don’t hold anything back.
If you want to receive an email the moment I launch this online course make sure you add yourself to my newsletter.
Step 5 – Start writing content for your author website

So you’re done with the technical stuff.
- You chose your website name and your website hosting
- You installed WordPress on your website
- You chose a design template
- You added the 3 plugins to your website I suggested
- The last step is to start writing content for your author website
The difference between pages and posts in WordPress
Firstly, it’s good for the people who’re new to WordPress to know when to use a Page and a Post to publish content.
image 19
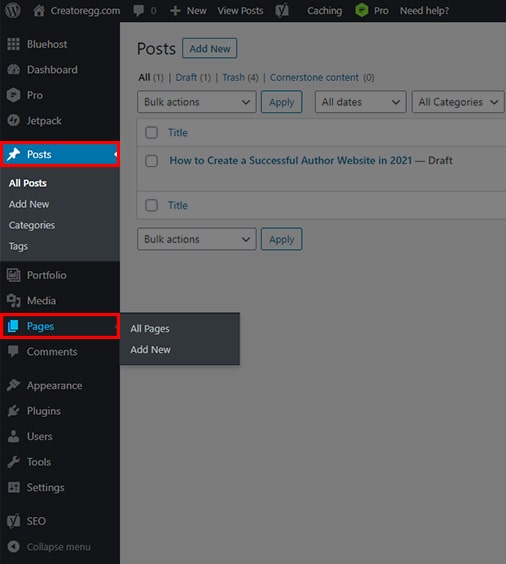
When do I use WordPress Pages?
My suggestion is that you use a Page for content like:
- Pivacy policy
- Terms of service
- Contact page
- Homepage
- And other similar pages like mentioned above
When do I use WordPress Posts?
Let’s say you’re an Excel-expert and you’re planning to write an ebook on the best Excel-tricks for financial data.
In that case, my suggestion would be to create and publish content/blog posts around your topic of Excel-tricks.
The same goes for this blog you’re reading now.
I published this blog as a Post.
If you’re ready to sell your books on your website, you use the earlier installed WooCommerce plugin to create Products and sell them to your audience.
You don’t use a Page nor Post to sell your book. Instead, you create a Product inside the WooCommerce plugin.
At first, it may seem a bit complicated.
Trust me; if you published a few pages and posts, you’d get the hang of it.
Add your photo to your website
For my two author websites and this website, I have added my photo to the homepage and its footer.

Especially for authors, I believe it’s important that you show the people who you are.
It creates trust, and trust will result in more sales for your books.
How did I add that photo of mine on the homepage?
Well, this is different with every WordPress design template, of course, but first, you need the photo, right?
You have a couple of options here:
- Use your own professional camera
- Ask a friend
- Hire a professional
- Use your smartphone
A couple of tips if you do it yourself:
- Use a plain background. I have a white wall in my living room that I used.
- Use enough lighting from as many sides as possible-meaning; you don’t want half of your face covered in shadow. I bought a couple of professional lightning online. I used them for shooting product photos and creating YouTube videos. You can also use the lamps in your home and don’t forget about daylight.
- Take a picture from your torso to your face. You want your face to be visible.
- Don’t sit with your arms crossed.
- Once you have the photo, you need to remove the background. If you don’t remove the background, it will look silly and unprofessional. If you have no experience with Photoshop yourself to do this, you can easily hire someone on Fiverr.com. I think it will cost you only $5 or something. Just create an account on Fiverr, post a request, and done. I did the same thing with my photos, and within 24 hours, you receive back the photos without the background.
I don’t know what template you use and therefore can’t explain how to add your photo to your homepage to create a similar look as my website. I’m working on my new online course where I show you how to create the same website as me. Hop on my newsletter to get notified the moment the course is ready.
Add a logo to your author website
Do you have a logo for your website?
If not, no worries.
There are plenty of options to get you a nice looking logo:
- If you’re a designer you can design your own logo.
- If you’re not a designer, like me, you can buy a logo from Themeforest.net. I purchased the logo I use for my author websites for $39 on Themeforest.net.
- You can also hire an expensive designer to hire a logo for you. Hiring a designer for this will probably cost you hundreds, if not thousands of dollars. I don’t see the point of doing that if you’re a beginner author trying to sell your books. Even I didn’t do that and still don’t change my logo, and I made $259,463 from selling my self-published books in 2020. Of course, you want a nice-looking logo, but you don’t need anything more than that.
- If you don’t like the options above, you can also create a job on 99designs.com. You can create a job offering on that website, and lots of designers will compete to create the best logo design for you. You can choose for yourself how much you want to spend. Do remember, the fewer budget results in fewer (professional) designers competing for your job. I created multiple jobs on 99designs.com to create a flyer and a folder a while back, and I liked the process.
Add professional-looking images to your website.
When creating blog posts to share information, I’m adding images to the mix like I’m doing now with this blog post.
Because this blog post is about creating an author website, it’s easy for me just to make print screens.
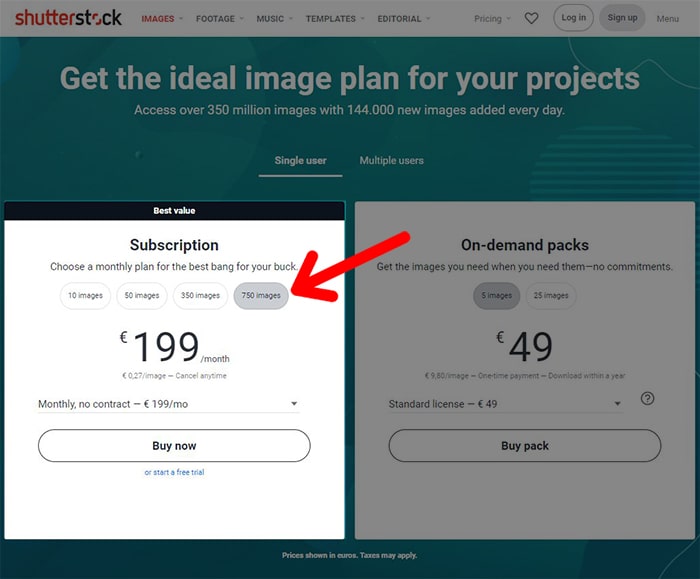
But for my books and many of my blog posts on my author website, I bought stock images on Shutterstock.com.
I believe they offer the best price for lots of photos.
They offer multiple pricing options. You can choose on-demand packs, which is crazy expensive in my opinion (around $10 per image), but you can also go for a subscription, which is what I did.
I went for the most extensive subscription where I could download 750 images for €199 (around $240).
Just make sure to download all the 750 photos you need within the first 30 days of your subscription so you can end the subscription.
Now you paid around $0.33 per image instead of $10. You’re welcome! 🙂
Image 21
Frequently Asked Questions

How much will an author website cost?
With Bluehost.com, the web hosting company I use for my English author website, www.puppybee.com, and this website, I paid around $170 for my domain name and web hosting for 36 months.
That’s about $4.70 per month in total.
I’m also using a premium (paid) WordPress design template for my websites.
The price of that template is $99. It’s a one-time fee.
Besides the domain name, web hosting, and the premium template, I bought a logo for $39 over at Themeforest.net.
Furthermore, I hired a designer ($13) on Fiverr.com to remove the background from the photo I have on my websites’ homepage and footer.
I bought stock photos from Shutterstock.com to use in my books and my blog posts.
I paid around $0.33 per image, and I bought 750 pieces, which totals around $240.
Lastly, I’ve spent years of learning and trial and error making websites and doing search engine optimization (SEO) to rank high in Google.
In 2014 I graduated with a Bachelor’s degree in Marketing.
For a couple of years, I have worked at an internet marketing firm to help ecommerce businesses with their SEO, ads, conversion optimization, and email marketing.
Since 2017 I’m self-employed.
As you can understand, learning the whole shabang isn’t something you can do in a day or two.
It took me longer than 10 years and I’m still learning.
I want to teach you the essentials, and therefore, I created this blog and multiple online courses.
If your goal is similar to such an outcome I made with my self-published books, please make sure to hop on my newsletter to get notified when I launch new content.
I believe my content will help you jump-start your journey so it won’t have to take you 10 years to accomplish similar results.
Selling on your own platform or third-party websites?
Should you sell your book through your WordPress WooCommerce website? Or should you link to your Amazon books’ product page?
Well, if you read this entire blog, then you know I’m a big fan of selling through your own website instead of third-party platforms like Amazon.
Let me tell you this:
My advice for beginners with no audience-meaning, no website visitors, or social following, I suggest starting with sending your traffic to Amazon’s product pages.
Why?
You can use their platform’s audience to generate traffic to your books besides the traffic you have from your own website and/or social following. By doing so, you can start building reviews on Amazon you can later use for your website.
The moment you have 10,000+ eyeballs on your website every month, you can change things up and give people the option to buy on Amazon or through your own platform.
The moment you decide to start sending traffic to your product pages on your own website, you should raise your prices.
And yes, of course, you should match the price on Amazon with your own website.
The beauty of selling through your own website is that you can easily giveaway gifts when people order your book through your website.
It’s not that easy to do so when they go through Amazon since you don’t have their contact information.
How to get visitors to my website?
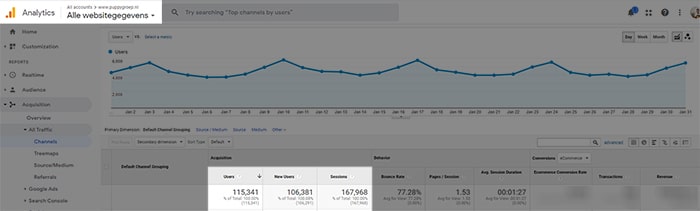
Nowadays, for my Dutch author website (www.puppygroep.nl), I receive 95,000 unique visitors every month on average.
I didn’t start with that many visitors, of course.
The moment I launched my first book, an ebook, I had 10,000 visitors per month on average.
I start building my website and audience long before I published my first book.
The question is, how did I receive website visitors in the beginning without any books to offer?
The answer is:
I spent time learning about keyword research.
By doing keyword research, you learn more about your audience.
Eventually, you know what search terms YOUR audience type in Google.
Back then, my goal was to find those search terms and write blog posts on those topics to rank high on Google.
The tool I use for keyword research is Google Keyword Planner.
Just FYI, in one of my new online courses, I will go in-depth on how I do keyword research for my YouTube videos and blog posts. Subscribe to my newsletter if you want to be updated as soon as I publish that course.
Free or a paid website?
As you just read, creating an author website costs money.
Is it possible to start a website for free?
You can start a free website/blog at places like Medium, Blogger, Weebly, etcetera.
The thing is, free website tools have lots of limitations-meaning; most, if not all, benefits from building your own author website are gone.
I don’t suggest starting a website on a free platform if you truly want to build an audience with it.
Can you give any author website design examples?
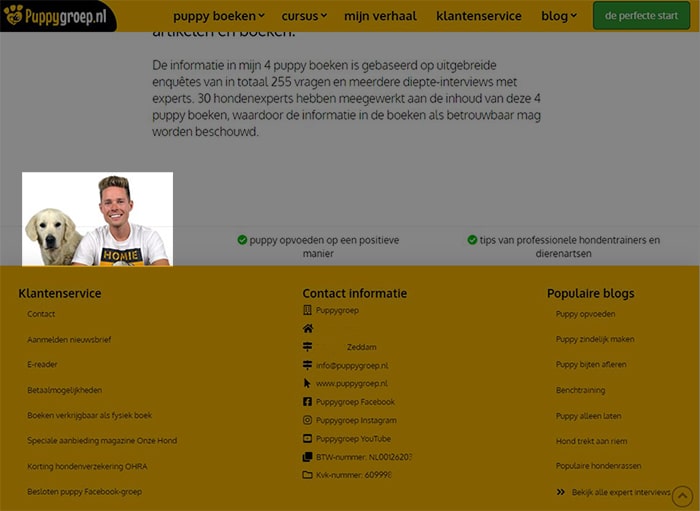
I would like to start by showing my own Dutch author website, www.puppygroep.nl.
As stated earlier, I have a Dutch author website and an English one.
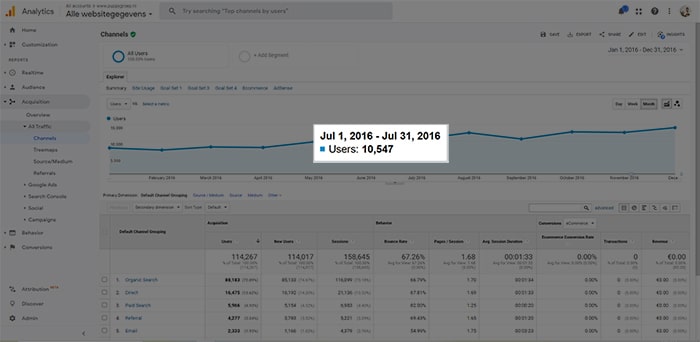
In 2020, I made $223,320 in book sales through my own Dutch WordPress website. You can see a couple of screenshots of the website below.

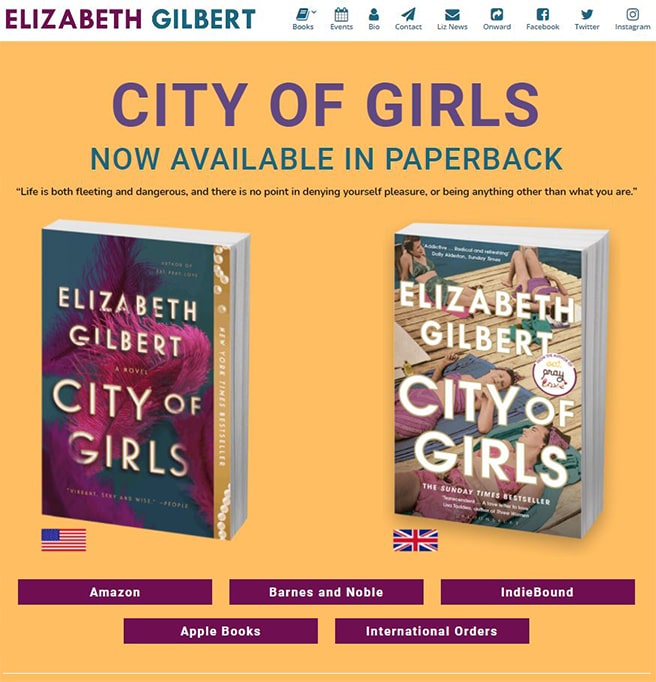
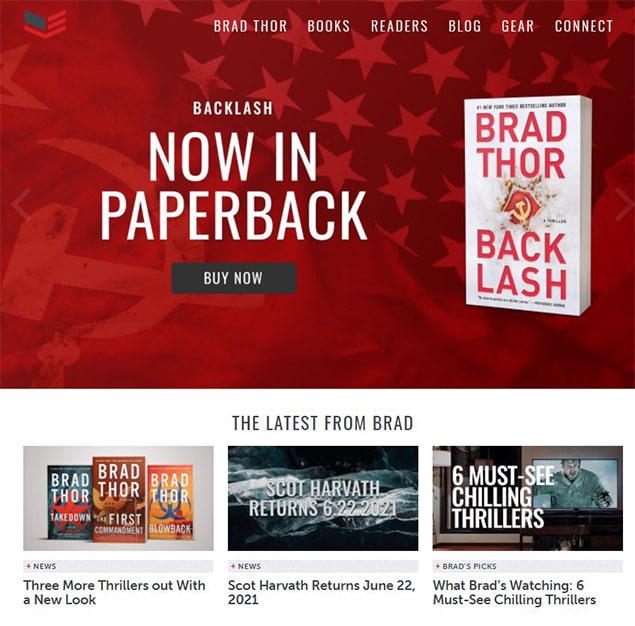
I also want to share some examples of websites of known fiction writers, like
Elizabeth Gilbert
Brad Thor
Hugh Howey
El James
Anthony Horowitz
Julie James
Tim Ferriss
Robert T Kiyosaki
Russell Brunson
Gayle Laakmann McDowell
I just shared some examples of success stories of fiction and non-fiction writers.
My advice for you is to stop studying what successful authors are doing NOW.
Right now, they already have a big audience that buys their products.
You SHOULD pay attention to how those authors got their first initial traction with their book(s).
From that, you can learn a ton.
You must know that there are many ways to get the same result.
I’m not an author that sold millions of copies of my books like Elizabeth Gilbert did.
Nor did I became a millionaire by selling my books, as she did.
According to an article on businessinsider.com Elizabeth felt lucky that suddenly, her book sales took off.
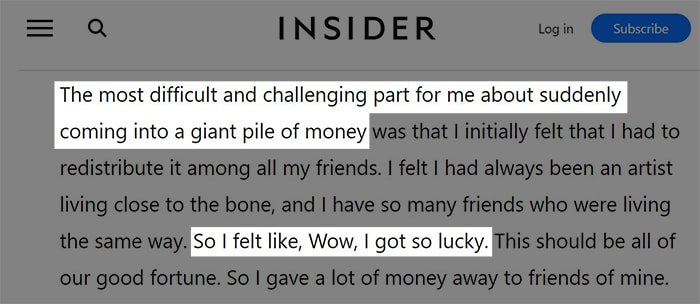
For me, this isn’t the case.
My book sales didn’t just suddenly took off.
In my case, it’s slow and steady growth.
I also don’t feel lucky.
I put the time in and did the work that was needed to grow my blog/website.
The more people that visited my blog, the more people entered my email newsletter, and the more people bought my books.
It’s a copyable process.
Going viral with a book, a video, a picture, or whatever is hard to replicate.
You often can’t pinpoint the exact reason why that thing skyrocketed in sales or views/likes.
Growing slow and steady is far more predictable, easier to understand, and easier to replicate.
I believe you need to stack the odds in your favor by building an audience instead of only aiming for that lucky shot.
Build an audience with your author website, and you have a higher chance of hitting that lucky shot you’re aiming for in the first place.
Best web hosting for authors
For my websites I use Bluehost.com. I’m happy with their price and service.
Best website builder for writers and authors
For my websites I use WordPress. It’s free and easy to use.
When buying web hosting at Bluehost it’s really easy to install WordPress. Please go back to the earlier steps in the beginning of this article.
Should I invest in an author website as a non-published writer?
I created my blog/website years before publishing my first ebook in 2016.
I had 10,000 visitors monthly when I published my first ebook.
So yes, you should definitely start your author website before publishing your first book.
Why do you need an author website?
I self-published 4 non-fiction books, and last year, in 2020, I made $259,463 from selling my 4 self-published books.
82% ($223,320) of the total earlier mentioned revenue came from my own WordPress website.
13% ($35,595) of the revenue of book sales came from partner sales. You can compare this by selling books on Amazon.
I could never ever made that much money if I solely relied on third-party sales.
Why?
5 reasons:
Reason #1 – I don’t have competition on my own website.
The only one selling books on my website is me. Compare that to Amazon, for instance, where your potential customers see many alternatives.
There’s a good chance that if you send people to your products on Amazon, they check out your competitors’ products.
Reason #2 – I can charge premium prices.
Try googling on best Kindle book price, for instance. The most given advice is to price your Kindle ebook in the range of $0.99 to $9.99.
I sell my ebooks on my website for €14.95. That’s $18.13 if I assume €1 = $1.21.
If you aim for $5,000 in revenue per month, you need to sell 5,050 books priced at $0.99.
If you price your book at $4.99, you only need to sell 1,002 that month.
Pricing your book at $9.99, you need to sell 500 books to hit $5,000.
For me, I only need to find 273 people to buy my book to hit that $5,000 mark since I priced my ebook at $18.13.
It’s the same story for paperbacks and audiobooks.
Reason #3 – I have higher profit margins by selling through my own website.
Are you familiar with Amazon’s royalty and pricing structure?
If you are, you know that when charging your ebook at $4.99, Amazon’s cut will be 30%.
Besides their cut, they also calculate delivery costs based upon your book’s file size. For the ebooks I’m selling through Amazon, that’s $0.42 delivery costs for every sale I make. That leaves me with only $3.20 for 1 ebook sale.
You might be wondering, why not charge higher prices?
If you go above the $9.99 per ebook price, the royalty structure changes, and you will only receive 35% per sale.
If I were to sell my ebook through Amazon for $18.13, I would only receive $6.35 in royalty earnings.
Now let’s take a look at how much profit I make through my own website.
First, let’s have a look at the fixed costs.
I need to pay for my website domain, and that’s $9.69 per year.
I also need to pay for my web hosting. That’s $3 per month or $36 per year, for the first 3 years, at Bluehost. I’m hosting this website (creatoregg.com) also on Bluehost. I paid XXX upfront to host this website for 3 years.
Then I have transaction costs for every sale I make.
It depends on whether the customer pays by credit card, PayPal, or by another way how much I need to pay for the transaction costs. On average, I pay $0.36 per transaction.
That’s it. These are my fixed costs—around $13 per month for my domain+hosting and $0.36 on average per transaction.
You will also have some start-up costs to get your website up and running IF you want to pimp your website a bit.
If you don’t want to pimp your website, you won’t have any more start-up costs than the earlier mentioned $13 per month.
There are free designer templates available, but they have their limitations. I’m a big fan of the template Theme X pro. That’s the template I use for all of my websites, including this one. The price of this template is a one-time fee of $99.
I also purchased a few plugins. You can compare a plugin with a paid application on your smartphone. An example of an app, or plugin as they call it, I spent money on is a review plugin to display customer reviews.
In total, I didn’t spend more than $100 on plugins/apps, I believe.
Reason #4 – I collect my customer email addresses on my own website.
Email marketing is an essential part of my success in selling my 4 self-published books.
Every time someone purchases one of my books, I sent them an email after a few weeks to ask for a review.
I now have 300+ reviews for my books-way more than my competition has.
Reason #5 – I can build an audience through my own website.
The moment I published the first book, I had around 10,000 visitors every month.
They came to my website because I published blog posts and did search engine optimization (SEO) to rank high in Google.
Nowadays, I have around 100,000+ visitors to my website every month.
Imagine getting 100,000+ people in YOUR store watching only YOUR books every single month. Crazy, right?
What’s the bottom line?
You need a website/blog of your own to build an audience to sell your books. It’s too big of an opportunity not to use.
If you’re finding this content valuable, share it with a friend, and consider subscribing if you haven’t already for updates on great content.
Sincerely,
Robbin 👋